
Understanding the Xcode build system - Part 2
Building app is a complicated process that requires many tasks needed to be done to make an completed cool app and release it to user. Fortunately, the Xcode IDE handles most of the work behind the scenes, so all we need to do is click the "Build" button on the toolbar and focus on our development. However, in order to use this efficiently, it is important to understand the process, as there may be times when we need to troubleshoot build errors. In this part, we will take a closer look at Xcode's build system, what it does automatically for us, and what we can do to make the build process more efficient and reliable.
The article is divided into 3 parts:
- Understanding the general build system and some terminologies (part 1)
- Understanding the Xcode build system and Xcode project structure (part 2)
- How can we help the Xcode build system (part 3)
The Xcode project structure and how it organizes things
Xcode Project
The Xcode Project is one of the fundamental parts that we need to understand when you start with Xcode. Simply put, it contains:
- References to source files: including source code (Objc header files, implementation files; swift files). Note that we mention about Reference, which is important as the structure and destination we see in the Project navigator might not be the actual destination of that file on the file system. In fact, many "references" of the same file can concurrently appear in many Project, or Target (will be described later)
- Groups which are used to organize the source files in the structure navigator. They can be match with the directory structure on disk or not.
- Build configurations (project level): for example debug build configuration or release build configuration
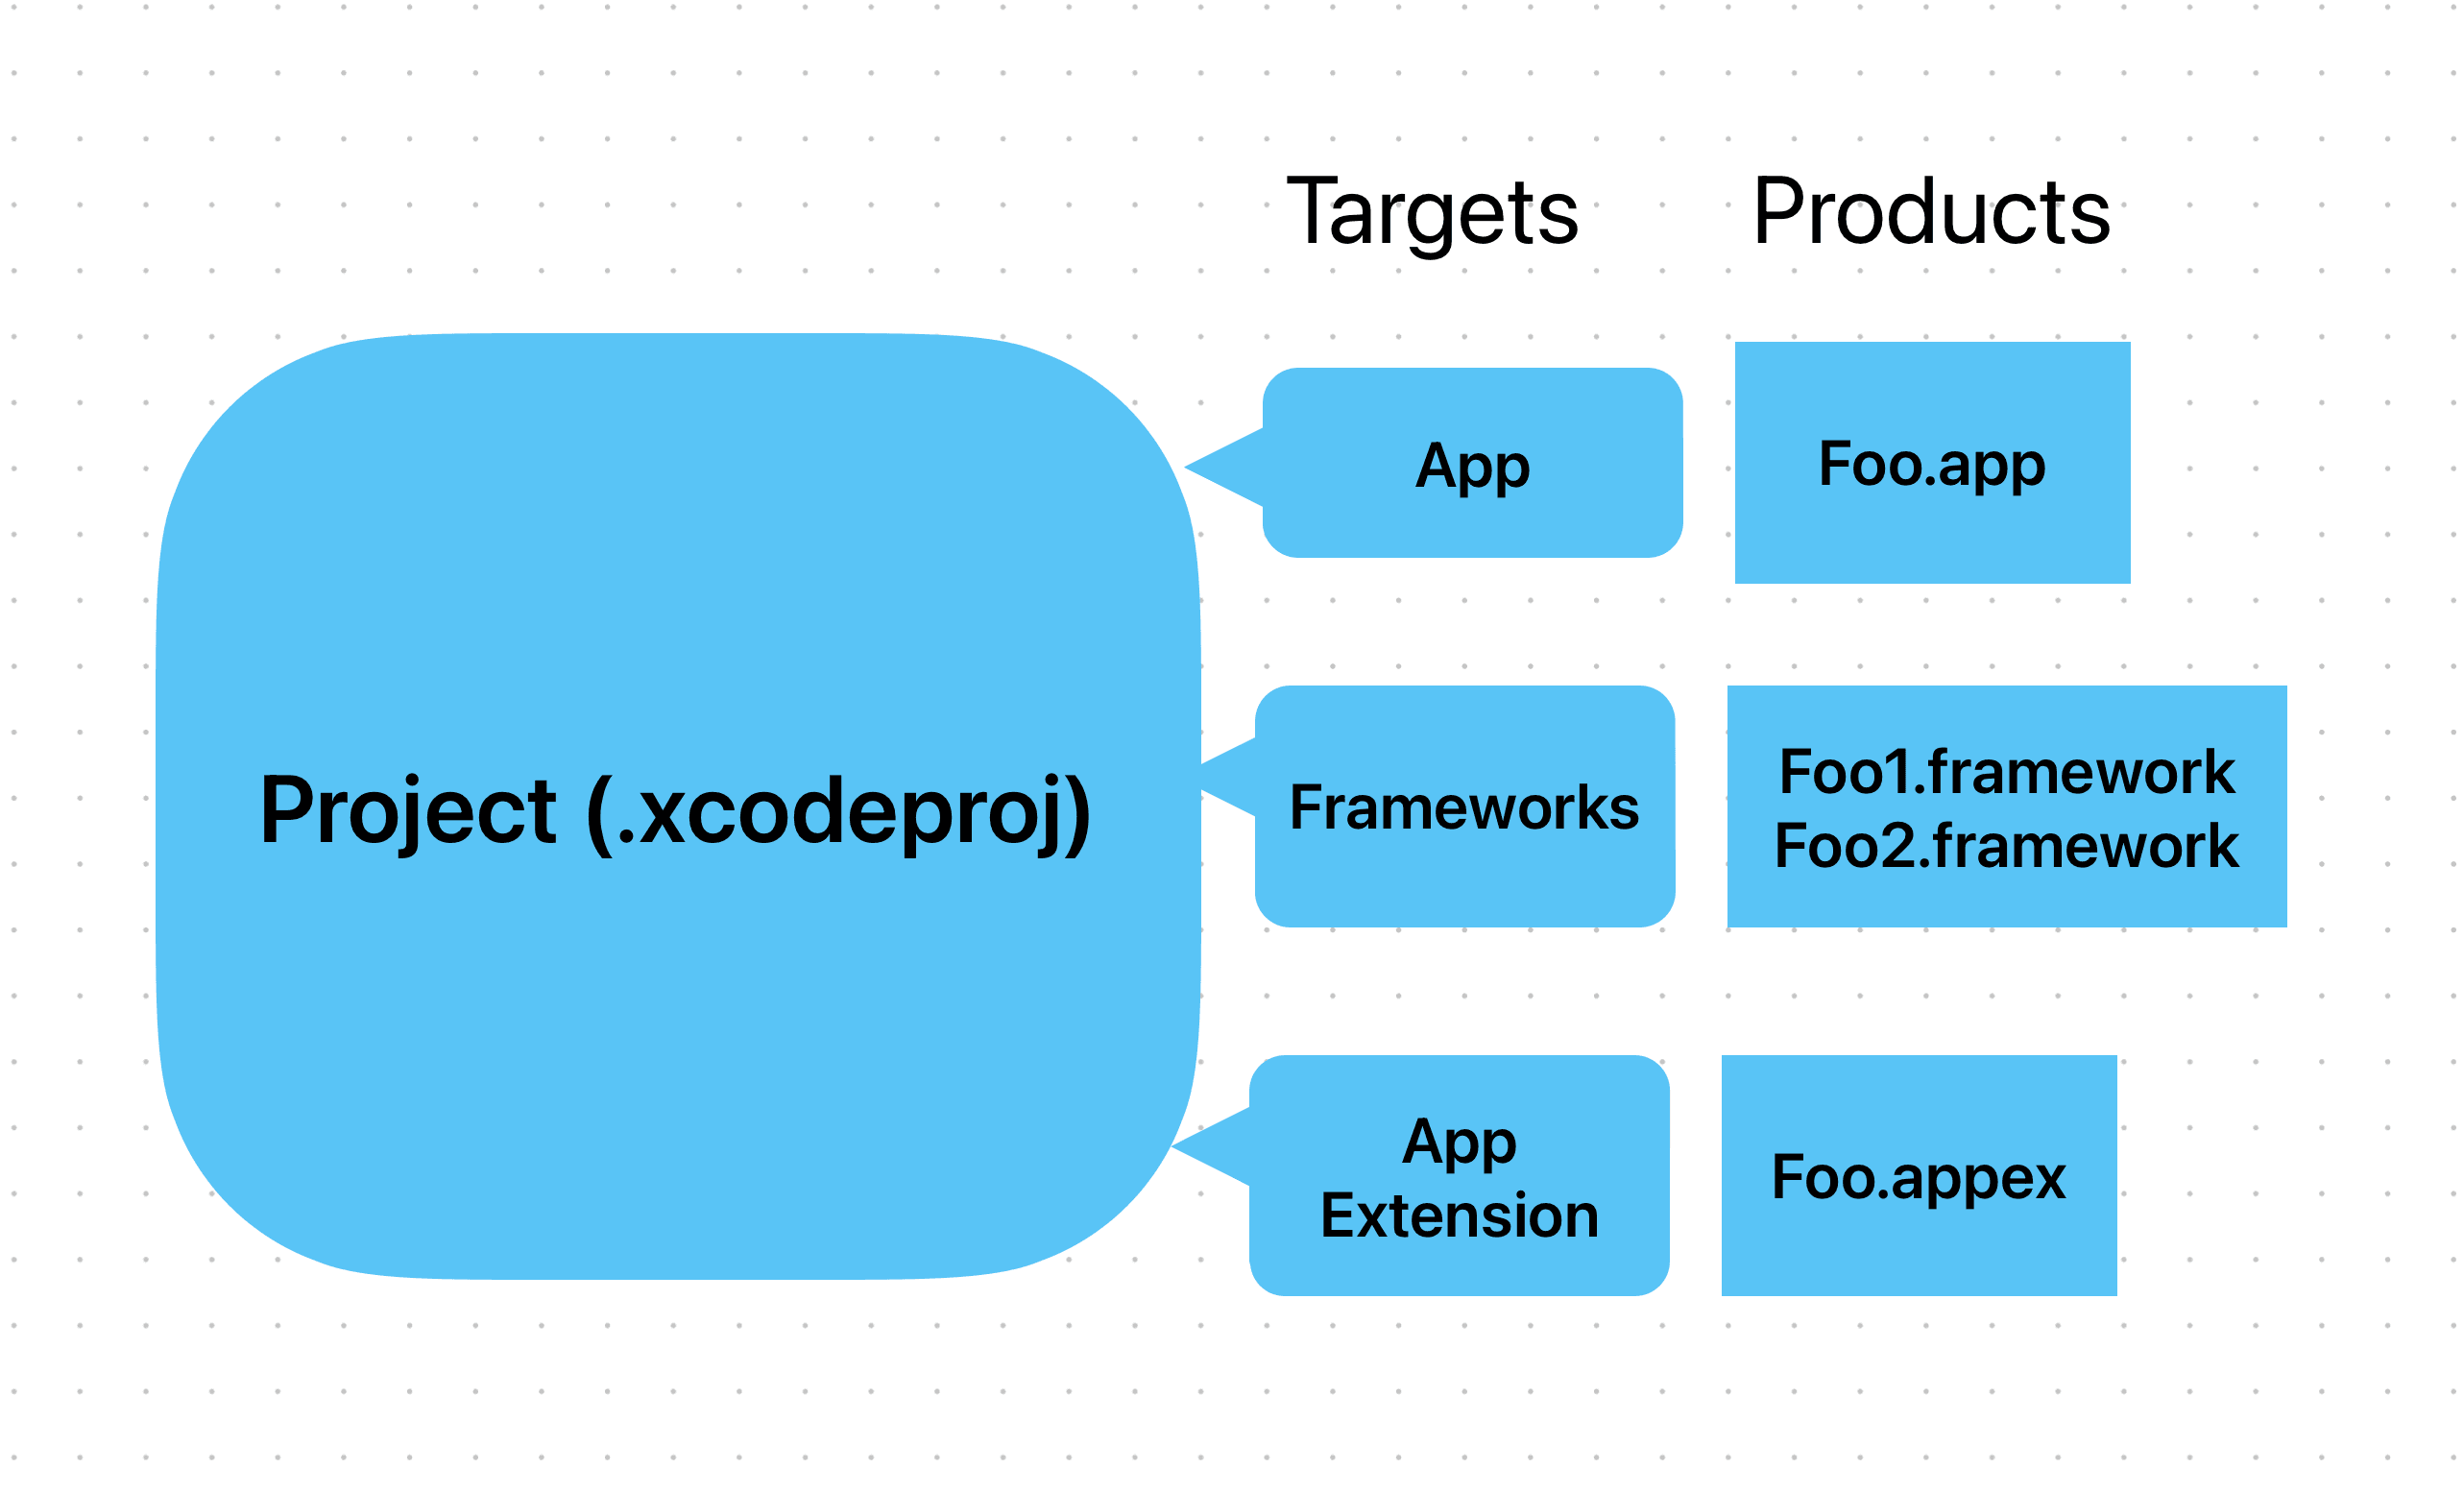
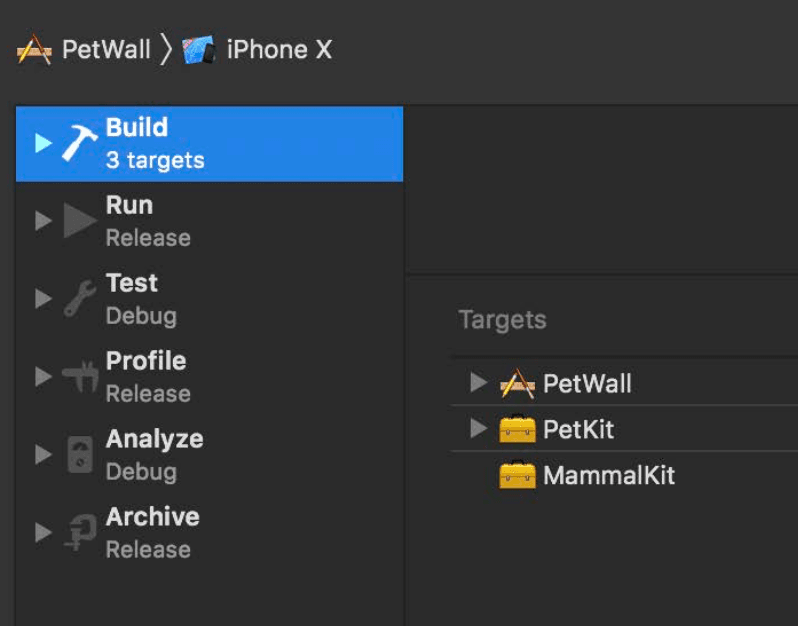
- Targets: This might be one of the most important parts. When we mention about Target, we also mention about its corresponding Product as an output. This is an 1:1 relationship between them. A target organizes the inputs into the build system, in this case they are source files and instructions for processing those source files that required to build the output product. There are something to note here:
- One project can have many targets and their corresponding product. For example the LINE project can have LineTests target which is used for testing, LINE app target which produces an executable app, LineSDK which produces a library for being reused in many app targets, etc ...
- The "instructions for processing those source files" we've mentioned above includes build settings and build phases. A build settings, for example, specify which options Xcode passes to the compiler, is a variable used in Xcode when building. While build phases can be used to specify the dependencies to other targets. Build settings can be inherited from the Project's build settings (project-level build settings) by default, unless we override them in specific target.
- The dependencies between targets are important as it defines the build orders and can affect the build performance, which will be described later. We can specify the dependencies in target's build phases (explicit) or let Xcode discover them (implicit).
- The Executable environments, specifies what executables to launch when you run or debug, what command-line arguments to be passed to the executable, or what environment variables to be set when the program runs. We can use Xcode schemes to set the above configurations. More details about Xcode schemes can be checked at here
Why do we need Xcode Workspace?
- We might notice the existence of Workspace when our application needs more third party dependencies, for example when using dependency management tool such as CocoaPod. Those kind of dependencies might come from other project so we need Workspace as an Xcode document that groups projects and other documents so we can work on them together. A Workspace can contain many Xcode projects and any other files as its references. It helps to extend the scope of many important Xcode workflows e.g. indexing - which provides the ability to prepare code completion, jump, etc ... We will get clearer structure with Workspace and all of the included projects are shared the same build directory, which helps to share code, libraries, improve the build order, etc ...
The Xcode build process
Most of the time, when we implement our cool features, we only need to care about our development. And it should be like that. As software engineers, our responsibility is very clear: we should spend most of our time understanding stakeholder requirements, the legacy codebase to ensure that we don't break anything, the robustness of our solution, the quality of each line of code we write... We should spend as little time as possible on the build process. This means minimizing the time we spend waiting for the build to complete and the time we spend looking into build errors to see what's going on.
Fortunately, the build process and its stability depend on the IDE (in client development) itself and the organizations in charge, and they are working hard every day to make things better. However, just like when we join a game, we need to understand the rules. Understanding the build process can help us avoid many annoying build errors that can slow down our work when we make mistakes. It can also help improve build performance when we follow the rules of thumb, so the time we spend waiting for the build to complete is significantly reduced.
So what happens when we press the "Build" button?
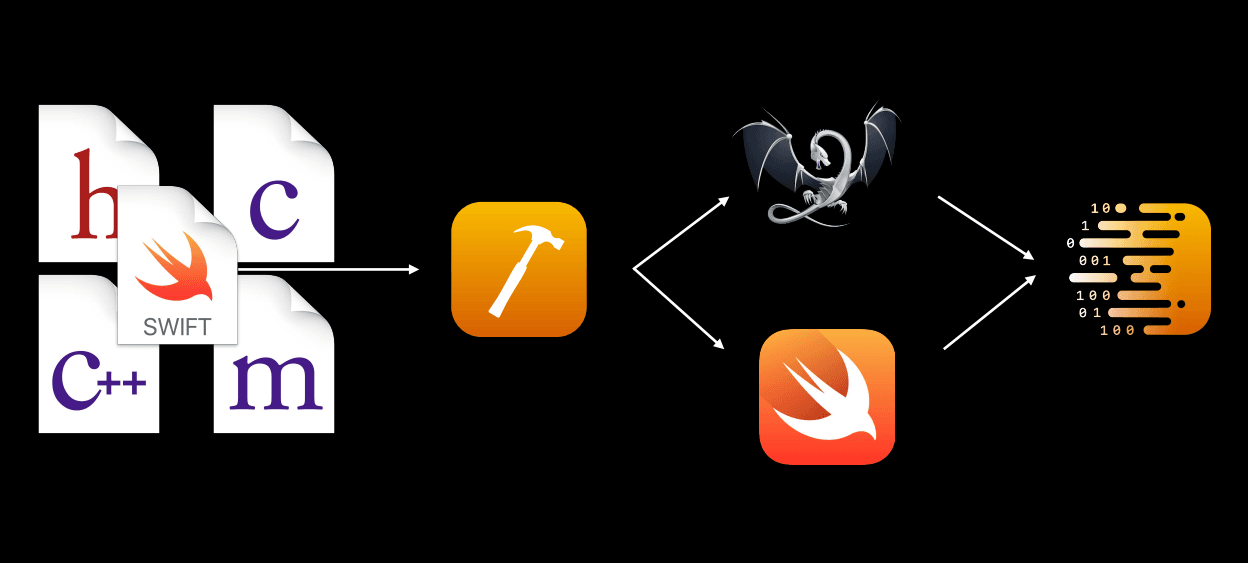
Behind the scenes, Xcode did a lot of works to bring our code, assets, configurations, ... into a completed application which can run on our devices. Those tasks include the preprocess source files and compile them before linking them by the linker, copy and process resources (e.g. headers, asset catalogues, storyboards, ...) do the code sign or even do some custom work by using scripts.

As mentioned in the previous article, we can do this without Xcode by using only the command line tool. However, the Xcode IDE itself can do much more and will be described in the following sections.
Build task and dependency order
When we press the "Build" button, the Xcode build system will process the project/workspace, take into account all the source and data files, targets, build settings and dependency relationships, separate them into Task units. Those tasks will be represented as a directed graph, describing what tasks need to run and the dependency order between them so the build system can decide what tasks should be run first or run before other tasks.
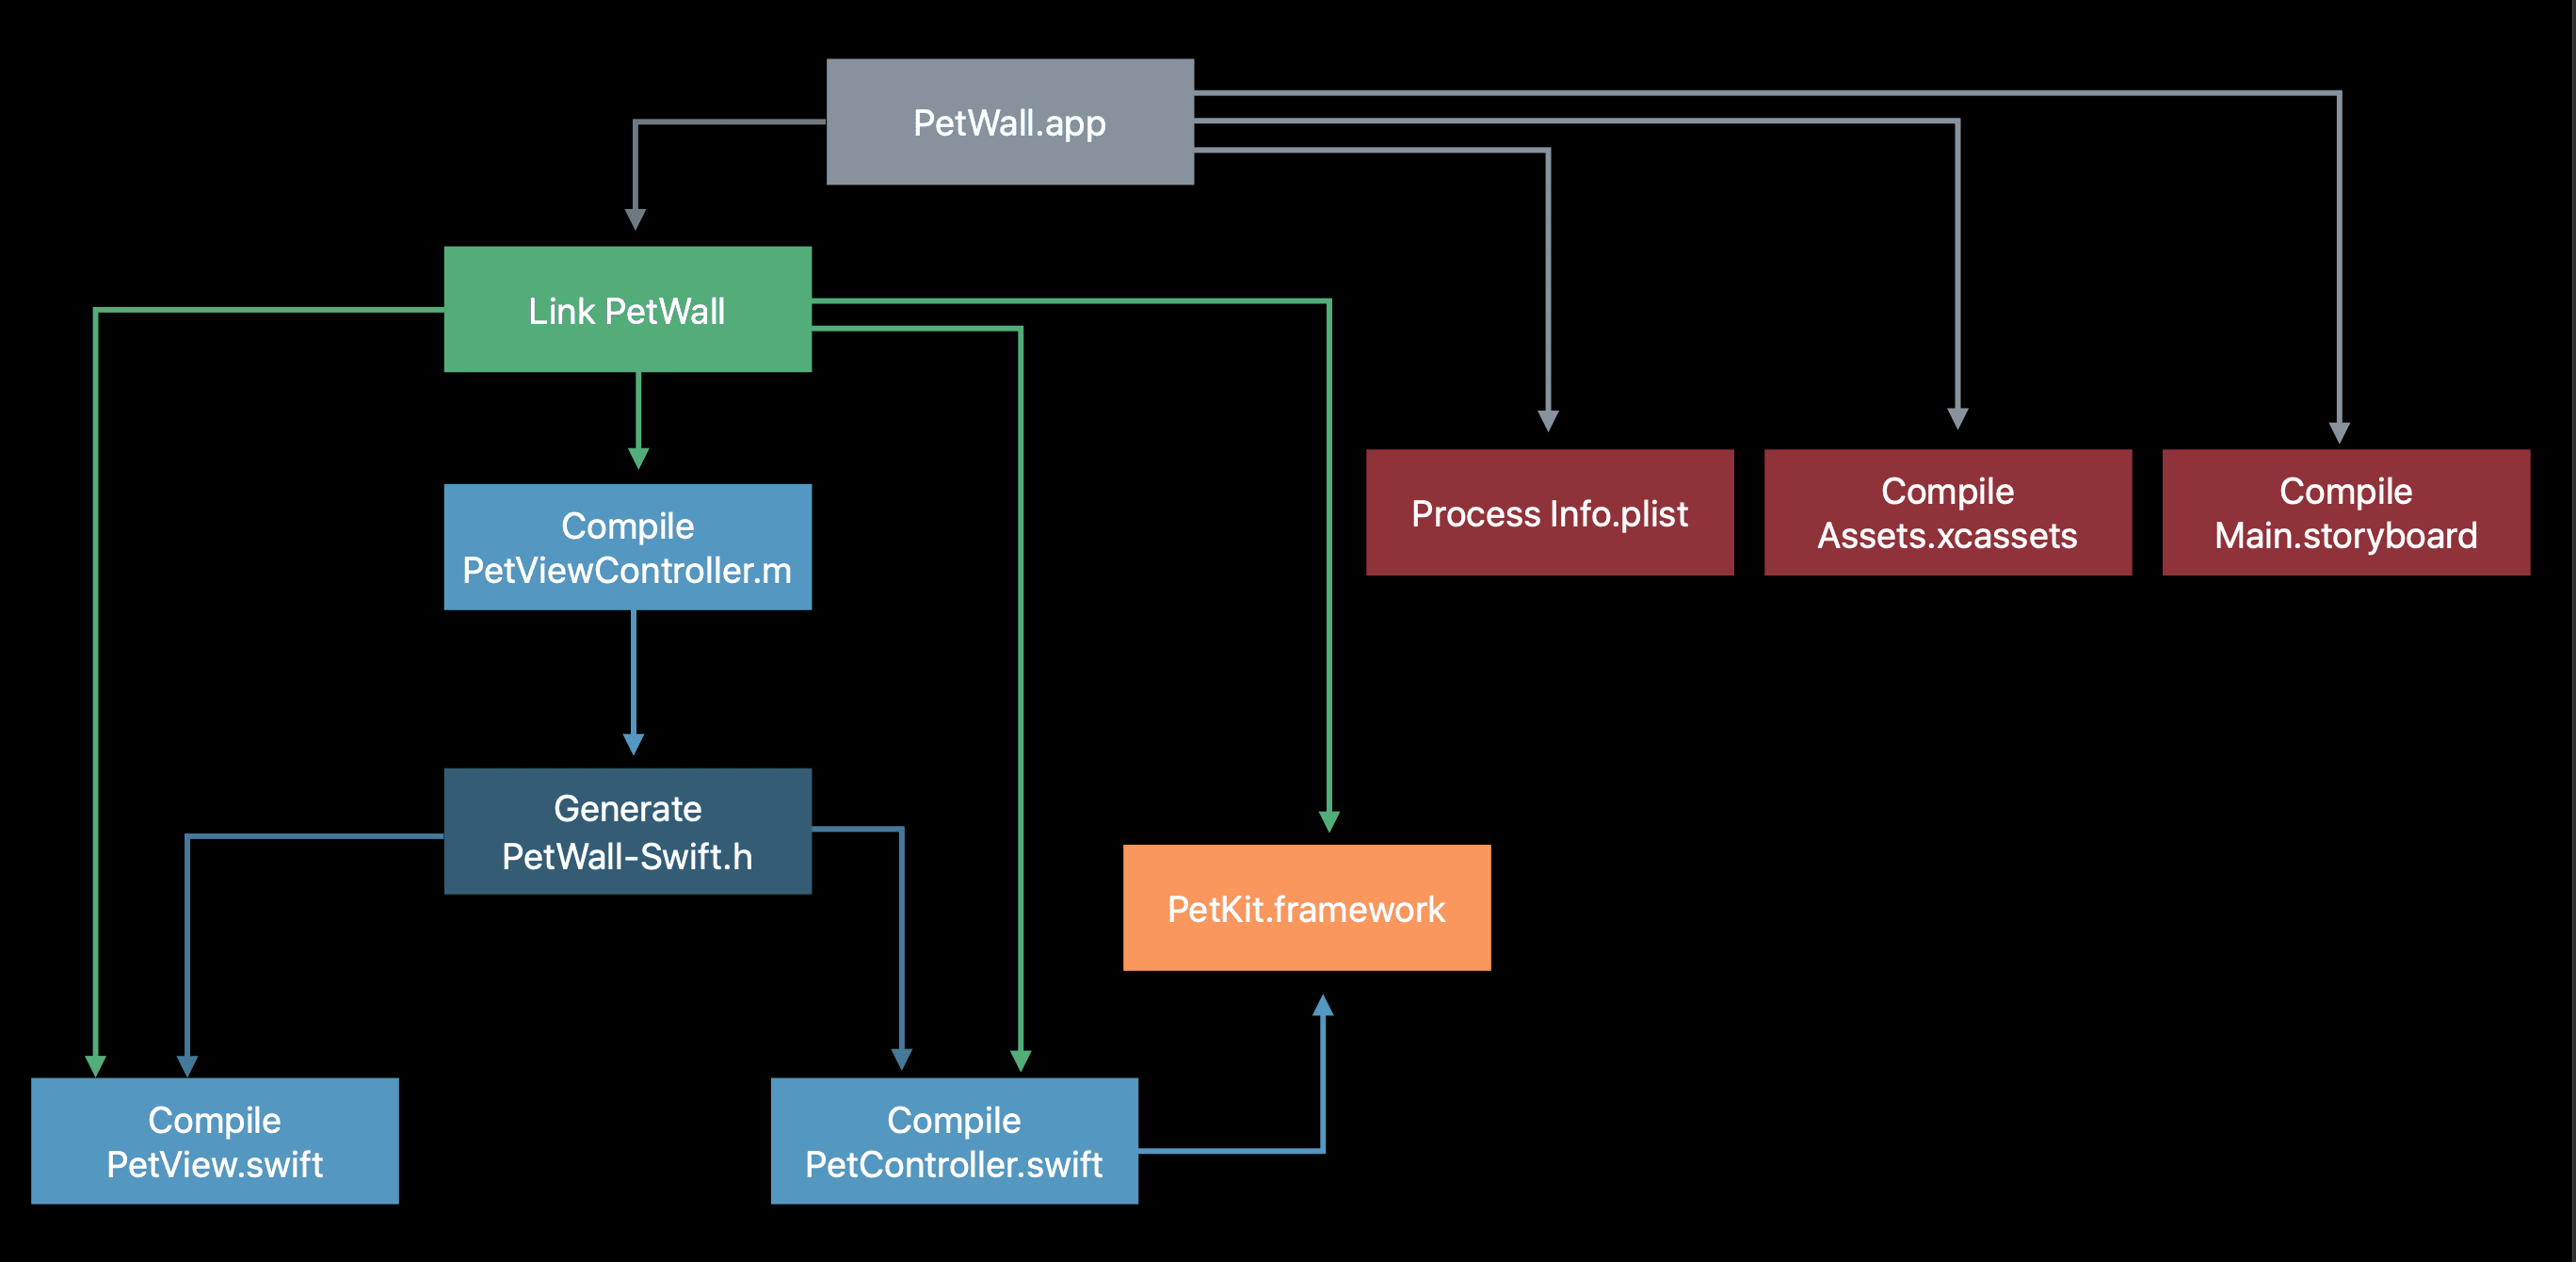
Then this graph will be used as input for the Apple's open source low-level execution engine called llbuild, and the build system then knows exactly which tasks to execute and their order.
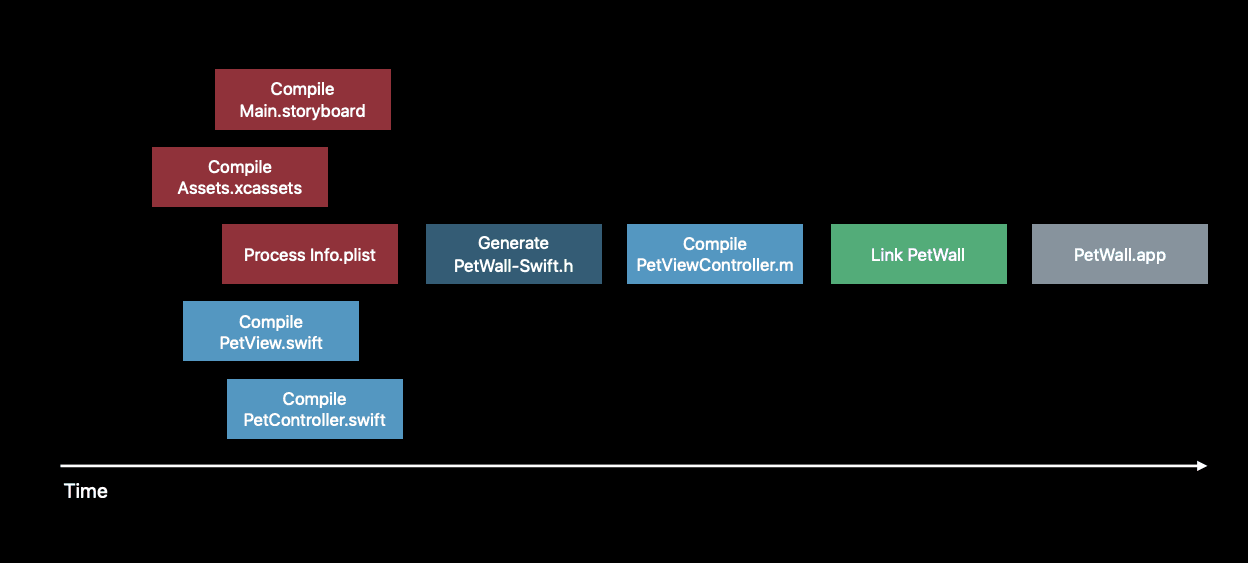
Separating the build process into tasks also has advantage for efficient build, which we usually mention as incremental build. Each task in the build graph has a signature, which is the hash computed from stat info of inputs (e.g. file path, modified timestamp, ...) and other task metadata (e.g. compiler version, ...). This hash will be used to compare with the previous one to detect changes and determine whether a task should be run.
We have mentioned about the dependency order. So where do those dependencies come from?
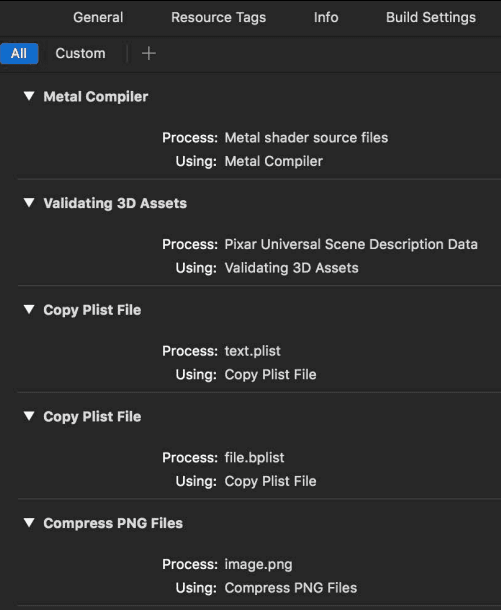
- Built in: The build system contains rules for the compiler, the linker, the assert catalogue, ... These rules define what kind of files are accepted as inputs and outputs are produced (you can check at the "Build rule" tab for any targets inside project for more details)
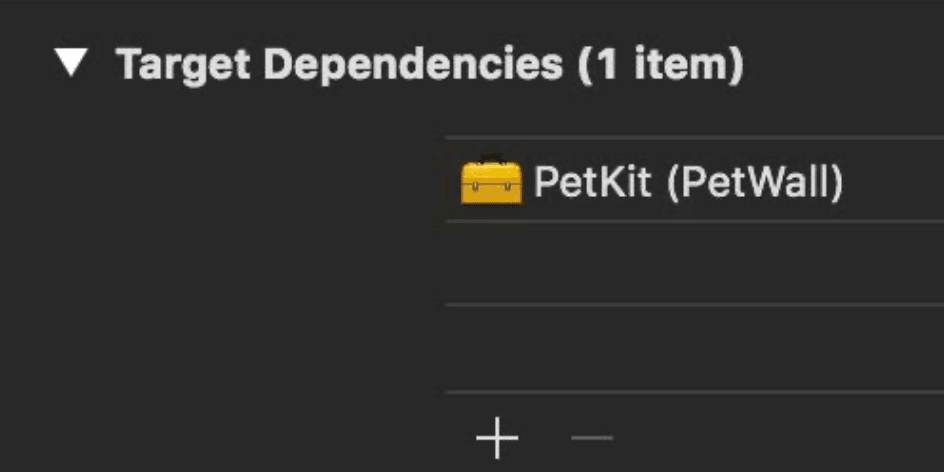
- Target dependencies: These are kind of explicit dependency which we mentioned before, define the orders in which targets are built as well.
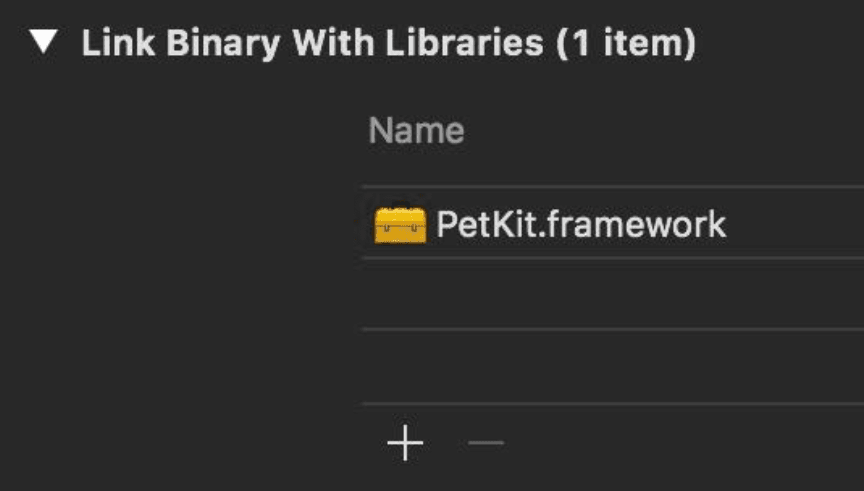
- Implicit dependencies: Libraries listed in Link Binary With Libraries are also treated as implicit dependencies.
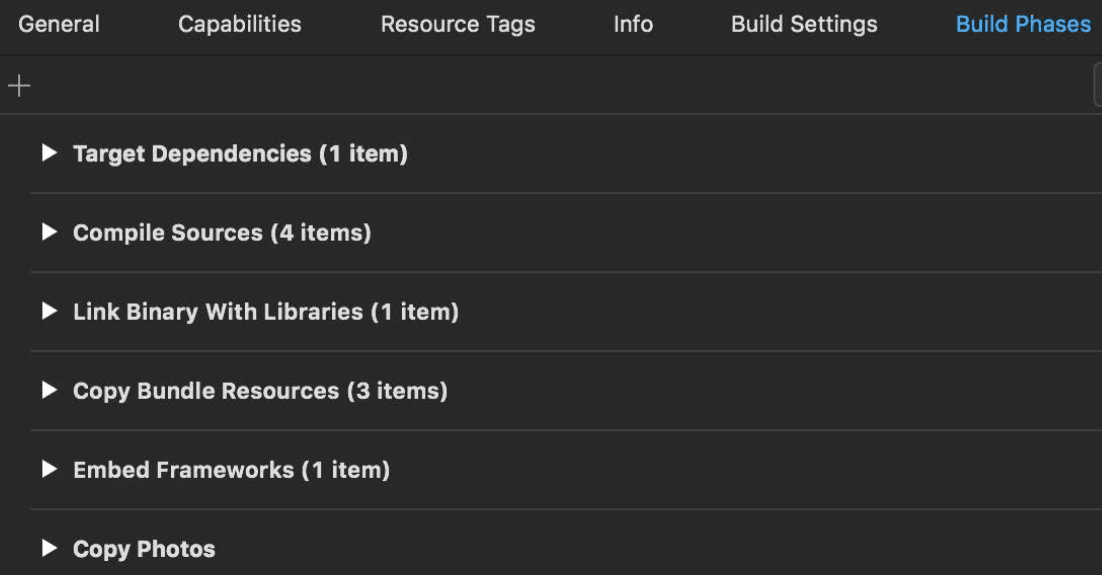
- Build phase dependencies: Tasks associated with each of these phases are usually running groups according to the order in which the phases are listed. But the build system might ignore that order if it knows better
- Scheme order dependencies: The targets listed in the build scheme are built one by one in the order that they are appearing if we turn parallelize build off. However, if the parallelize build is on, Xcode will attempt to build them in parallel so we can get better build performance.
 We might wonder how is the different between the explicit dependency in Target dependencies and the implicit dependency in Link Binary With Libraries. For the Target dependencies, we specifies other targets, in the same project or a referenced project, that Xcode must build before it builds the current target. Simply put, this defines the build order. While the Link Binary With Libraries is for the linking phase, we specifies libraries & frameworks needed for our current target so that the linker will get the corresponding symbols to put them into the output binary.
The compilers
- Clang
 Clang is an Apple's official compiler for the C language family (C, C++, Objective C/C++, ...). It has interesting background as a replacement for GCC. We need header files (.h) and their corresponding implementation files (.m) in order to compile them into .o files. A header file is a promise, saying that the implementation exists somewhere else. As a developer, we need to ensure that. Otherwise, we will get link errors at the linker step (will talk about it later)
We've already known that the implementation (inside .m files) will be looked for to match its corresponding header (.h files) at linking time. But how the headers will be found? Take an example when one header file called foo.h import another header bar.h. They are both in the same target but not in the same directory. But in the source code of foo.h we can just simply use #import "bar.h" How can Clang find the exact header we want? The answer is it uses something called "Header maps" - or .hmap files. Those are "files Xcode uses to compile the locations of the headers used in a target". They even help to find headers in other frameworks/targets by appending framework name. More details at here
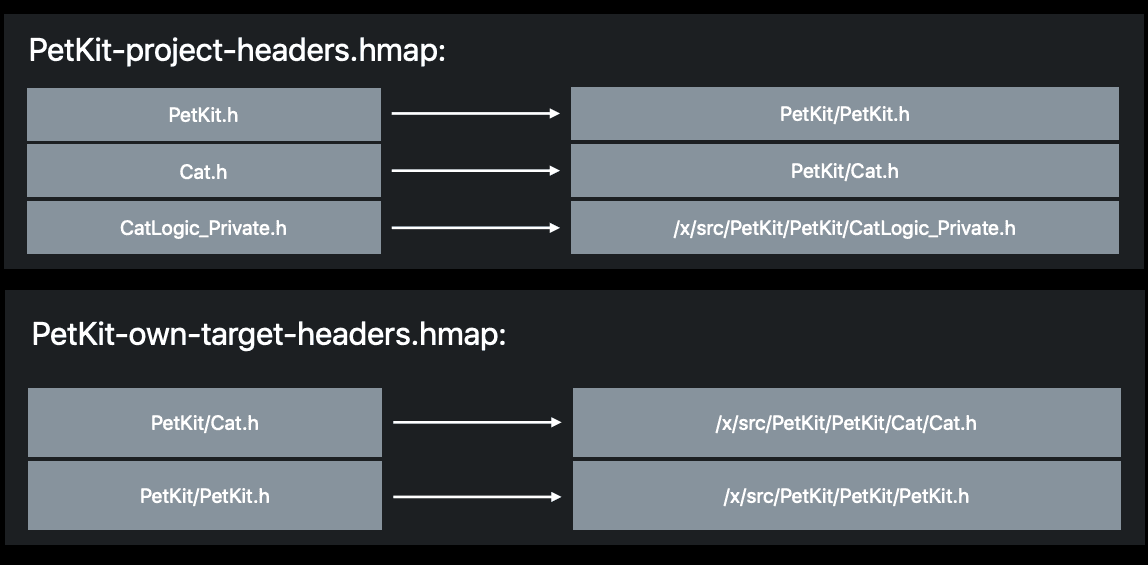 In the above example, the "project-headers" hmap file helps to map any usage of PetKit.h file to its corresponding PetKit target by appending the framework name before it (PetKit/PetKit.h). The "own-target-headers" hmap file then maps to its exact source path in the directory structure.
However, the "Header map" is only use for developer's code, and we also use other headers from system header files. For example, we use the Foundation framework everyday. Its corresponding header files include the Foundation.h header. How are they being found? Clang just simple searches in some paths e.g.:
$(SDKROOT)/usr/include
$(SDKROOT)/System/Library/Frameworks.(framework directory)
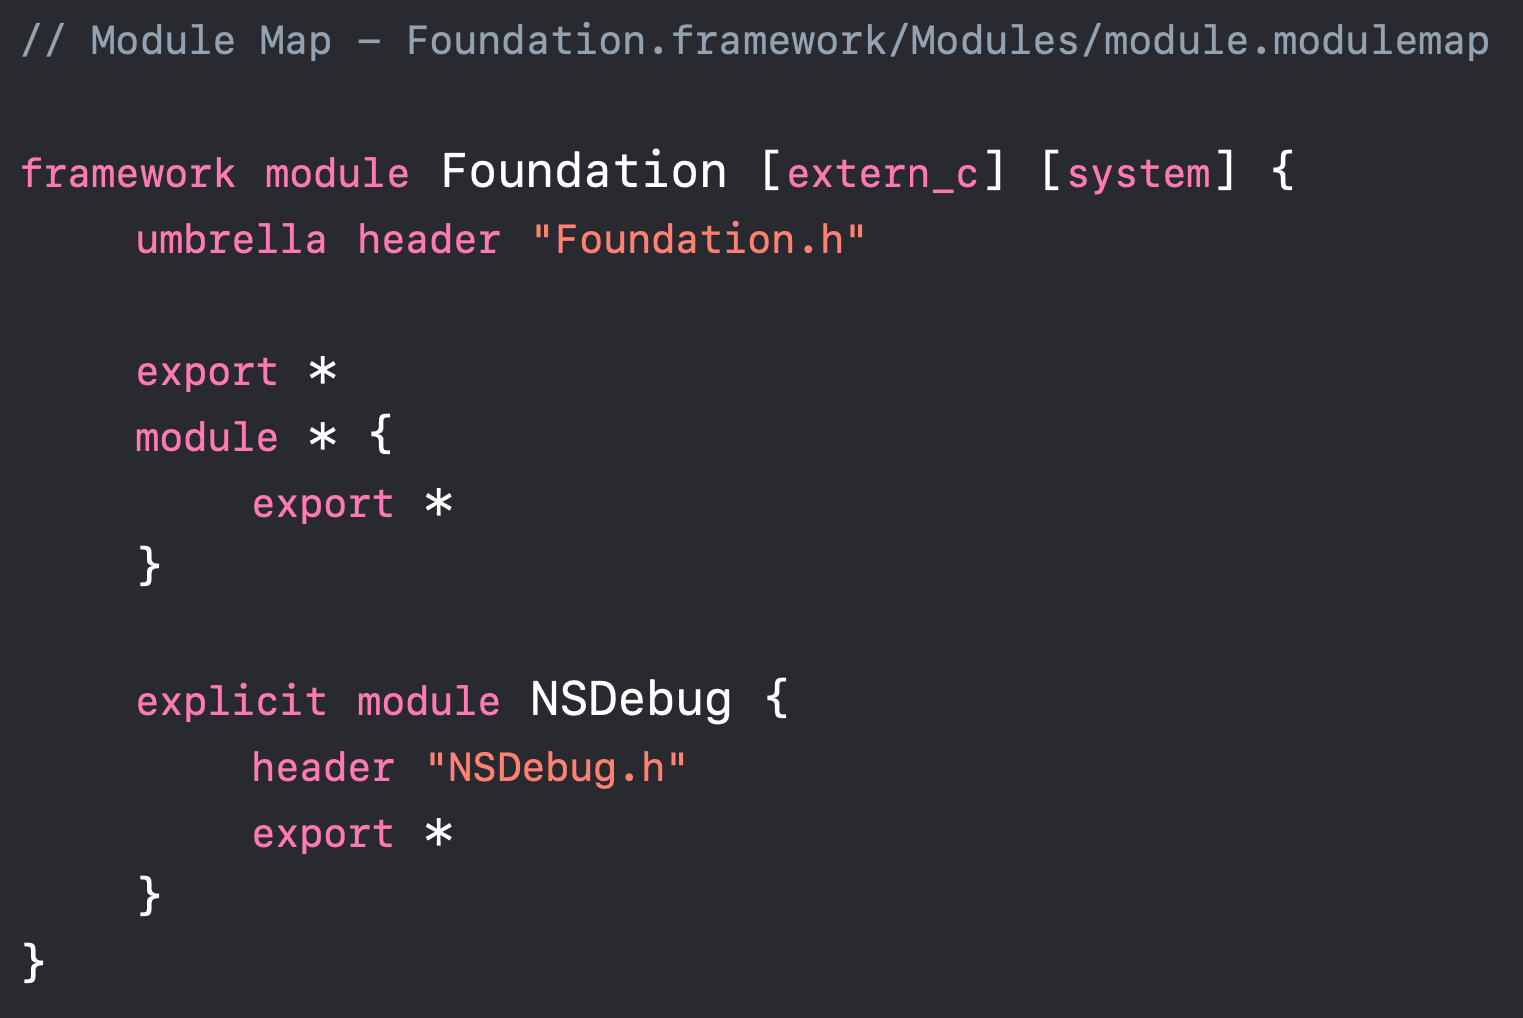
It's obvious for the purpose of "import" statement: We want to reuse the code from somewhere else. However, it is just from the code writer's perspective and Clang doesn't mind it. It just simply brings the source code to the place where the import statements are put. This naive approach is not efficient as it will cause a lot of duplicated code, but it can be solved by using "Clang Module". By introducing "module" with semantic import, Clang can parse the header only once and store the information in the disk and reuse it. In order to link between modules and headers, we need module map. It describes how a certain set of header files translate onto our module, including the name of the module, what headers are part of this module. For example, the following is the module map file of the "Foundation.framework":
 One of the obvious use case for the module map is when we use Objective C code inside Swift. In this case we need module map to import Objective C header as "module" (we can not import header files directly). Then in Swift we only need to do like:
import Foundation
Note that the "Foundation.h" header above is umbrella header, it includes all of the headers within its directory (and any subdirectories), so we don't need to write out header declarations for every library header.
- Swift

Swift does not have headers, which makes it easier for beginners to get started and avoids repeating declarations in separate files. However, this means the compiler now needs to do more bookkeeping work to find declarations. Nowadays, we use Swift more often, and Swift itself embeds Clang and uses it as a library, so we can work in projects that contain both Swift and Objective-C languages.
When Objective-C files were compiled, the declarations (for example class A use class B from somewhere else but not the same implementation file with class A) were easily found by using the import header. The compiler just simply looks into the header to find what it needs. Swift doesn't have this advantage and the compiler need to do more, which is finding declarations. The situation is even more complex when declarations might come from many sources: They can be from the same with the current Swift target, or from a arbitrary Objective-C framework, or headers from the same application/unit test bundle, or a mixed of Swift and Objective-C framework.
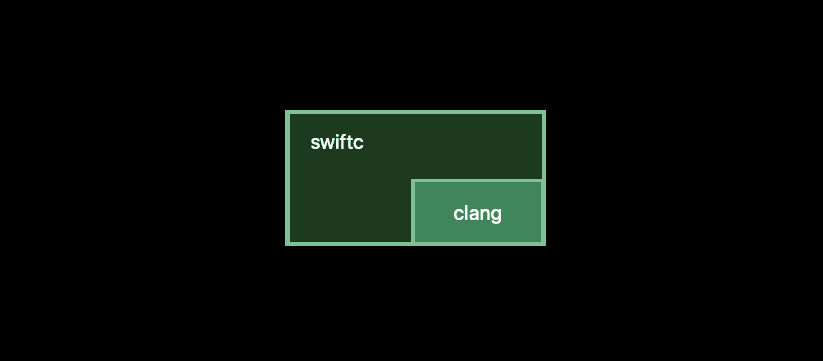
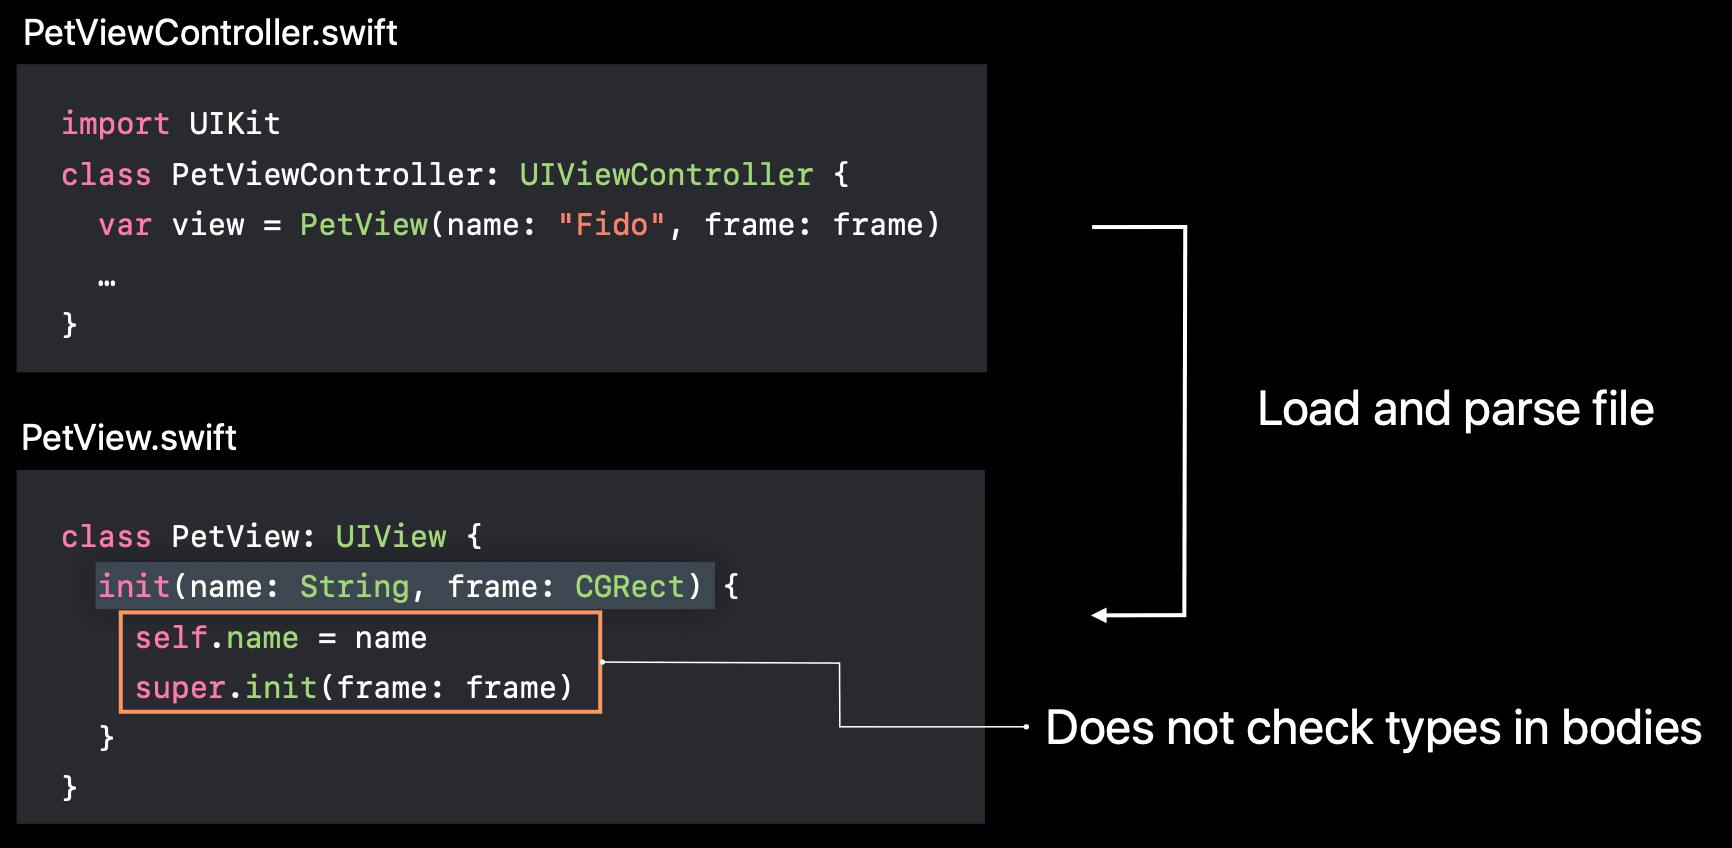
- For finding the declarations from the same Swift target, the compiler need to parse all other Swift files in the target. This can be simply described by the following image:
- For declarations coming from Objective-C, the compiler finds them in headers exposed in Clang's module map for that framework as described in the above section, or the target's bridging header if both Swift files and Objective-C files are in the same App target
- For declarations coming from a mixed framework, the compiler can find them by using the umbrella header as we can not use any bridging header in a framework. Note that the umbrella header solution is only for public header files. If we want Swift to access to private header files, we need to do a little trickier thing, which can be found here
So you may wonder how Objective-C code will be used after Swift finds their declarations? As it is Swift, it can not use Objective-C interfaces directly. Instead, the Clang Importer makes those methods more "Swifty", which means they will adapt to Swift's convention. For example, we might have already been familiar with the Apple's API document for their UIKit or other framework written in Objective-C: they have options to switch between Swift and Objective-C like this:
 In the above example, the "pet" argument is omitted when calling the method, and the error returned is transformed into a throwing error so we can use the do...catch statement in Swift. Clang do this for us automatically. But we can help it if it sometimes doesn't satisfy us, by using NS_SWIFT_NAME to change the imported name explicitly.
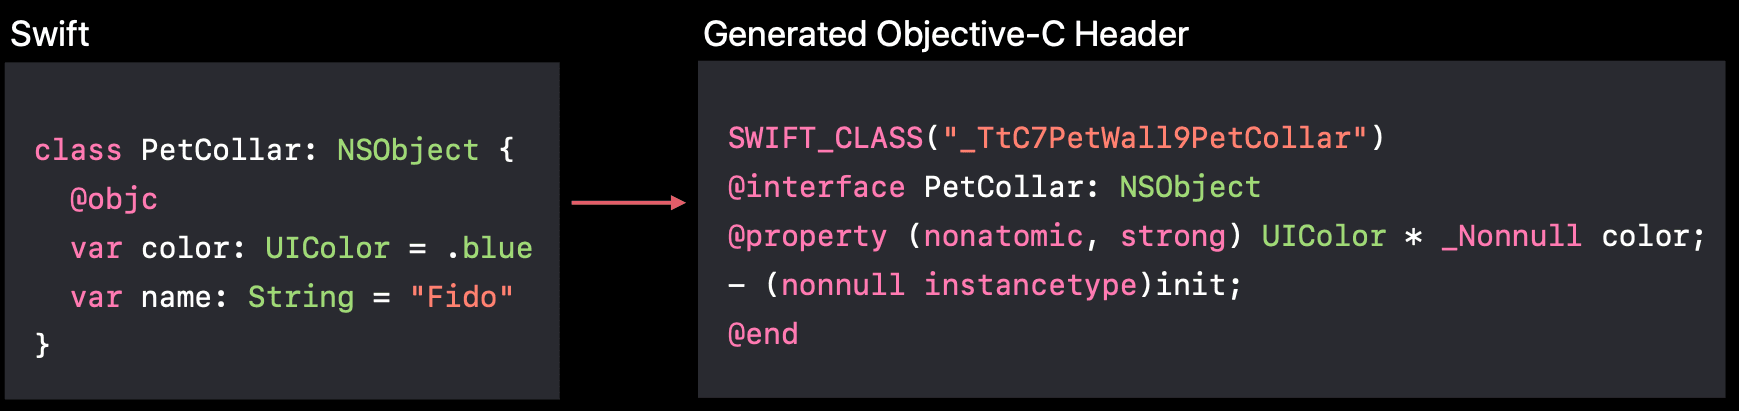
Inversely, Objective-C code can use Swift code in case the Swift classes extending NSObject and methods/properties marked @objc. Note that only public declarations if they come from Frameworks. For App target and unit tests, internal declarations are also allowed. While building, the compiler generate Objective-C headers from Swift so they can be used inside Objective-C code. The compiler also mangle Swift class to prevent conflict, for example:
When compiling Swift files, the compiler also produces another file which is called .swiftmodule. It is serialized, binary representation of module's declarations, which will be deserialized by the compiler to check the types when you use them. It also includes the names and types of private declarations so that we can refer to them in the debugger, or the bodies of inlineable functions, like static inline function in Objective-C header.
In summary, the process of using Swift and Objective-C together can be simply described at below:
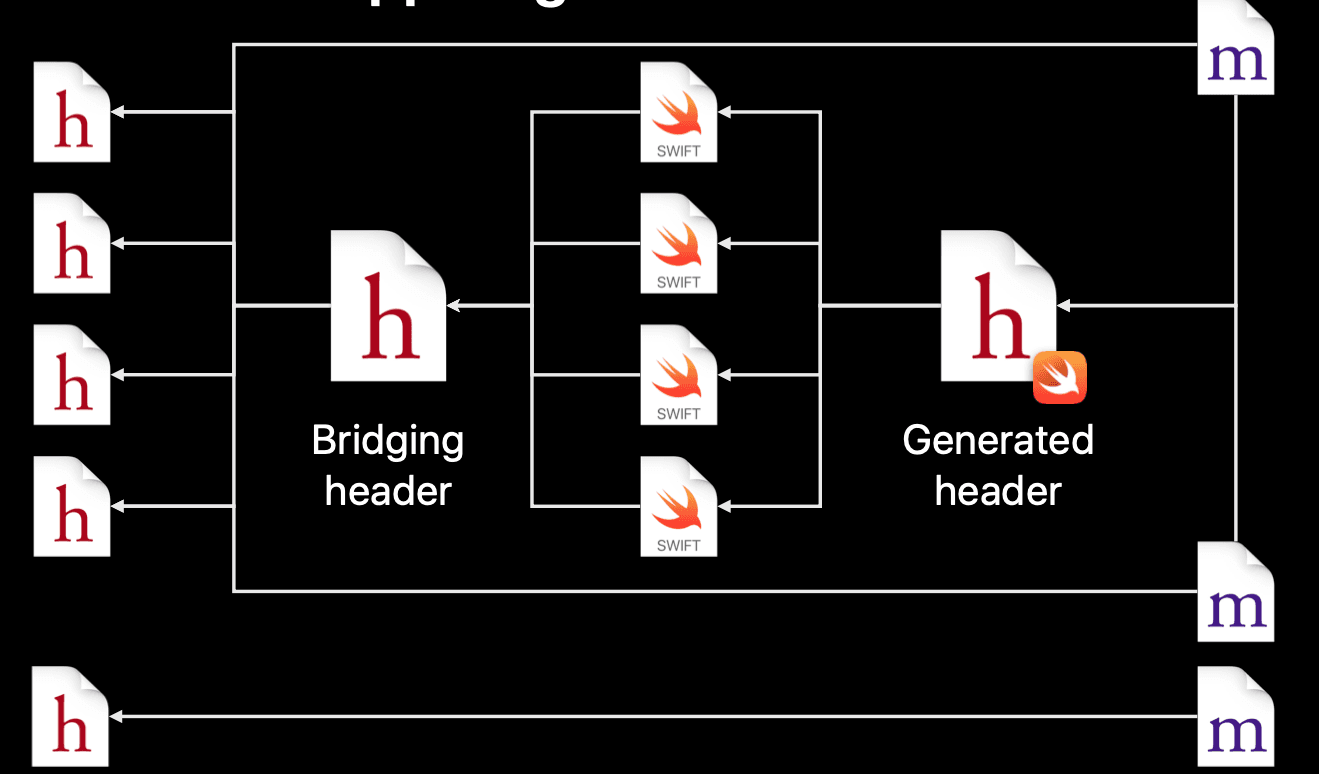 Looking the image from left to right, we see that header files are used inside Swift by "Bridging header". Swift files themself can be exposed to Objective-C implementation files by "generated header".
The Linker
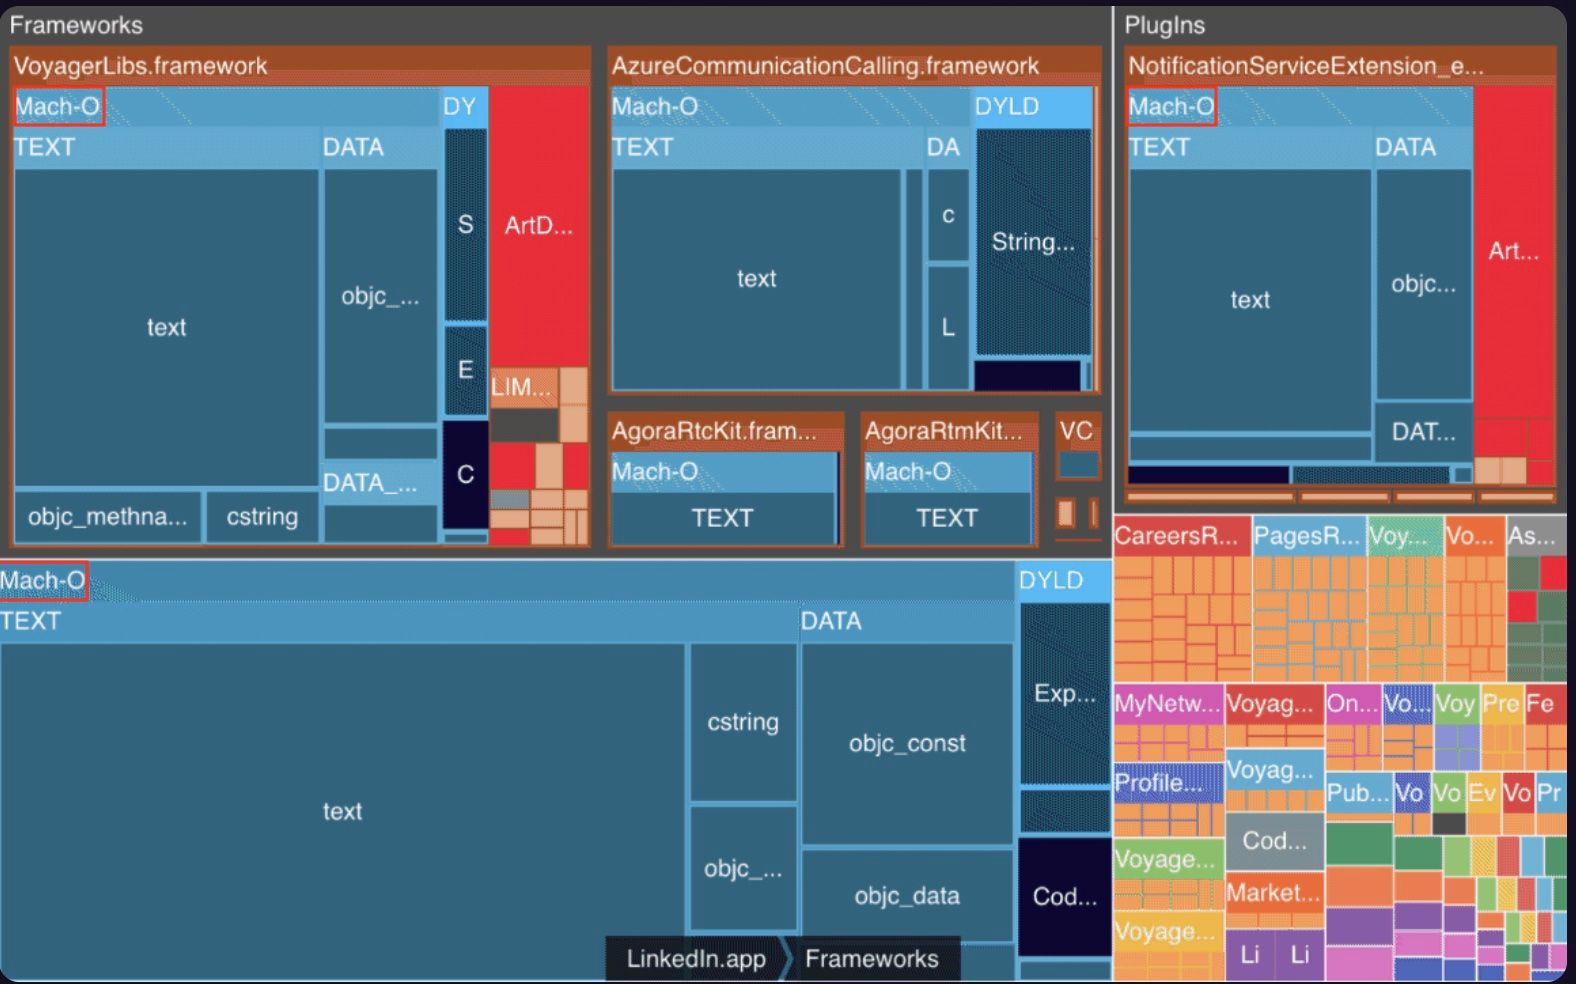 According to the document, Mach-O is the native executable format of binaries in OS X. It is also used for iOS and other systems based on Mach kernel and those systems also use this format for libraries and object code (wikipedia). They can have no filename extension, .o, .dylib, or bundle extension. There are a bunch of tools used to build and run Mach-O files with various type of products e.g. Intermediate object files, Dynamic shared libraries, Frameworks or Bundles, etc ... That means the name Mach-O is just a general name for those kind of file types which contain executable code.
A Mach-O binary is made up of one Mach-O header, followed by a series of load commands and one or more segments, each of which contains one or more sections, which then contain code or data (symbols). The Mach-O header specifies the target architecture of the file, such as x86-64, while the Load commands specify the logical structure of the file and the layout of the file in virtual memory. There are several types of load command e.g. segment load command, link libraries load command, application main entry point load command, ... and some type of segments are of interest in relation to performance such as __TEXT segment and __DATA segment
A Mach-O file is the result of the linking process produced by the Linker, which takes inputs as object files (.o) or Libraries (.dylib, .tbd, .a). All of them contain symbols, which represents each of the code and data fragments as mentioned earlier. The Linker takes a number of object files and copy executable code from them into segment, in this case the __TEXT segment, or resolve those undefined symbols by looking through other .o files to find the matching symbol before copying it.
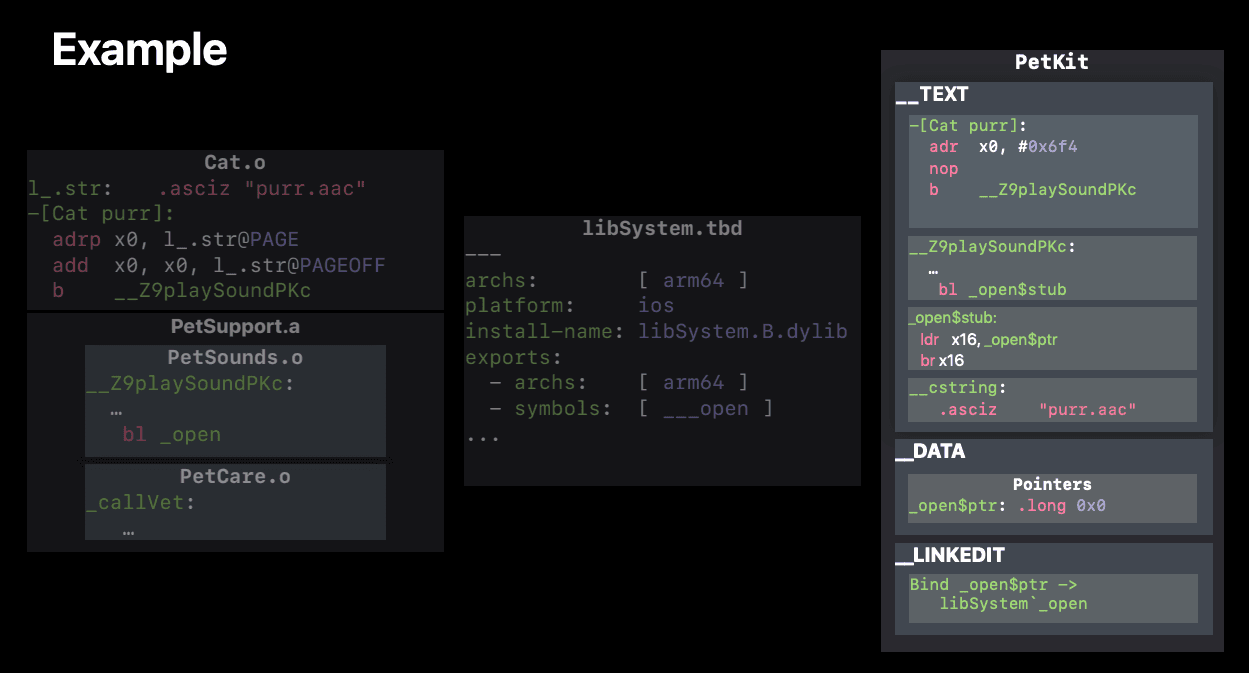
When using Dynamic Shared Libraries and Frameworks, the process for Binding or Searching for symbols are also needed at run time. Please refer to this for more details.
In summary, we've already gone through many steps to see what happens when we press the Build button and what Xcode has done for us behind the scenes. We also know how Swift and Objective-C code can be used together inside a project with the helps of the Compiler to produce the output, and how the Linker links them together to create executable binaries before they can be loaded and run on devices. Let's check for the future articles talking about some of the error handling cases while building and some best practices to make the build faster.
References
https://www.emergetools.com/blog/posts/static-vs-dynamic-frameworks-ios-discussion-chat-gpt https://devstreaming-cdn.apple.com/videos/wwdc/2018/415o65ozc2l1bc3/415/415_behind_the_scenes_of_the_xcode_build_process.pdf https://developer.apple.com/library/archive/documentation/DeveloperTools/Conceptual/MachOTopics/0-Introduction/introduction.html#//apple_ref/doc/uid/TP40001827-SW1