
The first step to SwiftUI's Animation System: From Architecture to Advanced iOS 17 Features
- 15 Sep 2025 |
- 05 Mins read
The Complete Guide to SwiftUI's Animation System: From Architecture to Advanced iOS 17 Features
SwiftUI changed how iOS developers think about animations. Instead of UIKit’s old imperative style where you had to manage every detail, SwiftUI lets you just describe what should animate and it handles the rest. This guide walks through everything you need to know, from the basics of how SwiftUI’s animation system works to the advanced tools added in iOS 17.
SwiftUI vs UIKit Animation
UIKit takes an imperative approach. You must set up animation lifecycles, manage callbacks, and manually handle state changes (example, comparison). While you get fine control, it also makes code long and complex.
SwiftUI is declarative. When state changes, SwiftUI figures out what to animate and applies the animations you specify (explanation, implicit vs explicit). This cuts down boilerplate and keeps animations smooth.
Performance differs too. UIKit gives direct access to Core Animation for deep tuning. SwiftUI instead optimizes automatically: batching updates, reducing layout recalculations, and using GPU acceleration where it can (see the tips, and video).
Core Animation Basics
View Tree vs Render Tree
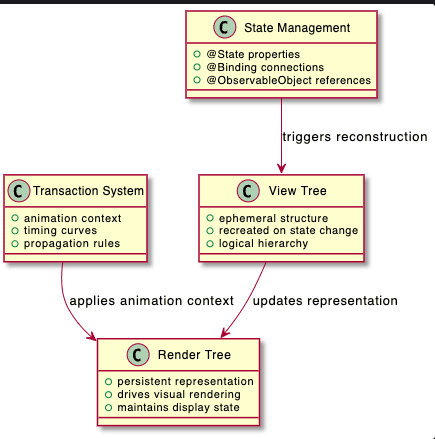
SwiftUI works with two linked trees:
- View Tree: the structure from your Swift code. It’s temporary and rebuilt each time state changes (source, how it works).
- Render Tree: SwiftUI’s internal structure that actually controls the screen. It persists between updates and handles animations (details, behind the scenes).
This separation makes it possible to keep SwiftUI declarative but still fast.
State-Driven Flow
State is the single source of truth. Wrappers like @State, @Binding, and @ObservableObject trigger updates automatically (overview, guide).
Animations calculate progress values between 0.0 and 1.0 to smoothly move from old to new values (article, deep dive).
// State drives animation behavior
@State private var isExpanded = false
@State private var progress: Double = 0.0 // Progress interpolated during animation
var body: some View {
Rectangle()
.scaleEffect(1.0 + progress * 0.5) // Progress creates intermediate values
.animation(.linear(duration: 2.0), value: isExpanded)
}

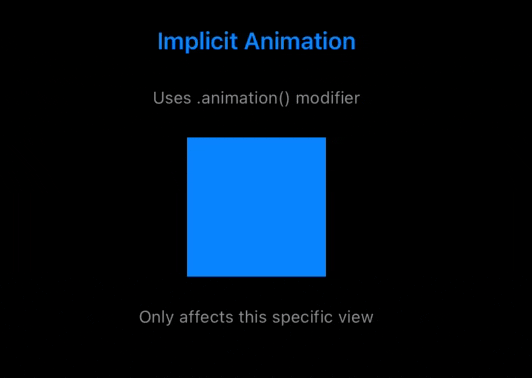
Implicit vs Explicit Animations
- Implicit animations use .animation() directly on views. They affect only that view’s properties and trigger when values change (examples, discussion).
// Implicit animation - scoped to view subtree
Rectangle()
.fill(isActive ? .red : .blue)
.scaleEffect(isActive ? 1.5 : 1.0)
.animation(.spring(), value: isActive) // Only affects this view's properties
- Explicit animations use withAnimation to wrap state changes. Everything inside animates together (Take a look at this comparison for more information).
// Explicit animation - affects all changing properties
withAnimation(.easeInOut(duration: 0.5)) {
isActive.toggle() // Both properties animate
scale = scale == 1.0 ? 1.5 : 1.0
}
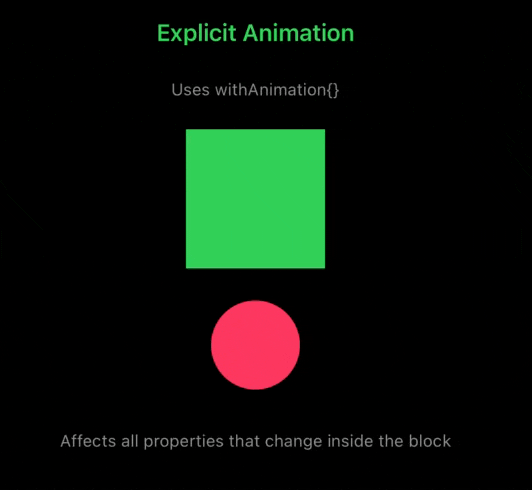
When both exist, implicit wins. That order is: explicit triggers → state changes → view re‑evaluates → implicit overrides.
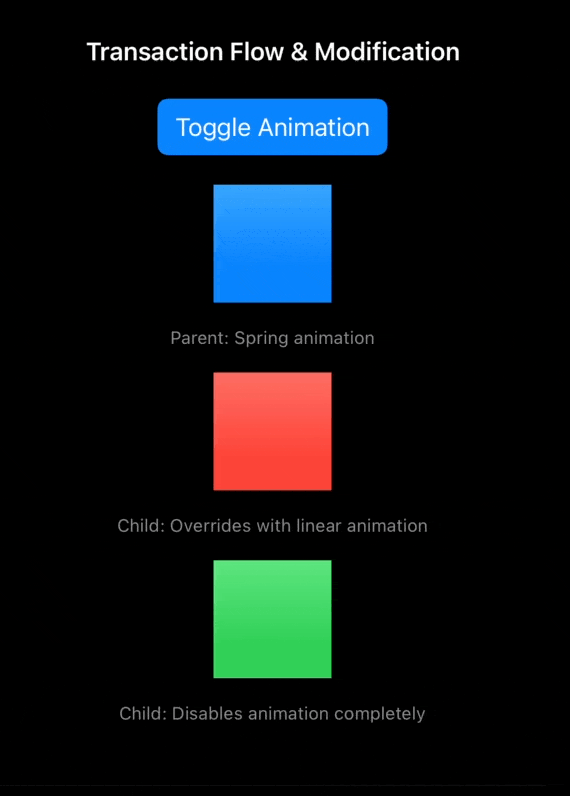
Transactions
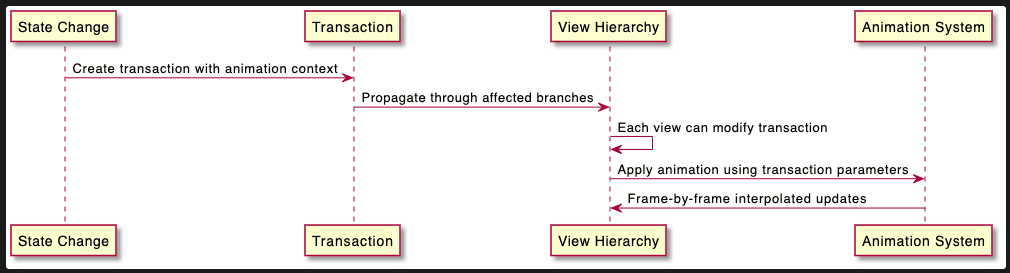 Transactions carry animation context (like curve and duration) through the view hierarchy (see this guide, and article). Explicit animations create them at the state change site, while implicit ones modify them locally. This guide from objc.io will clarify those things.
// Transaction modification example
.transaction { transaction in
// Modify animation context for this view subtree
transaction.animation = .easeInOut(duration: 1.0)
// Can disable animations: transaction.disablesAnimations = true
}
Timing Curves
Timing curves shape the feel of motion (objc.io article, Design+Code):
- Linear: steady speed.
- Ease curves: gradual acceleration/deceleration.
- Spring: physics‑like, bouncy (repo, post).
Custom Bézier curves are also supported.
// Different timing curve examples
.animation(.linear(duration: 1.0)) // Constant velocity
.animation(.easeInOut(duration: 0.8)) // Natural acceleration/deceleration
.animation(.spring(response: 0.6, dampingFraction: 0.8)) // Physics-based motion
.animation(.timingCurve(0.68, -0.6, 0.32, 1.6, duration: 1.0)) // Custom Bézier curve
Animations on State Change
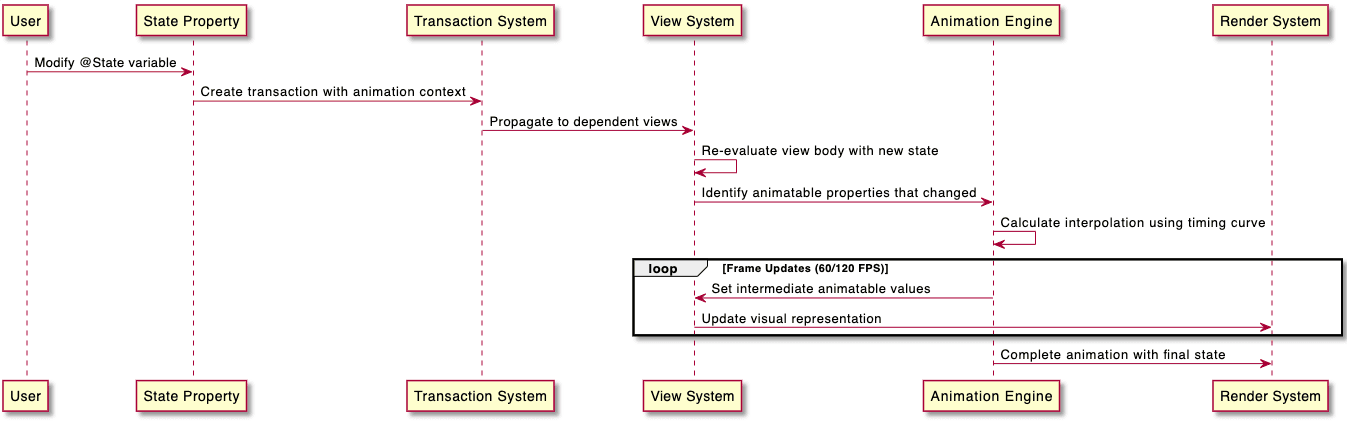
When state changes, SwiftUI:
- Creates a transaction with animation info.
- Finds views depending on that state.
- Rebuilds their body.
- Identifies animatable properties.
- Interpolates values frame by frame.
- Updates visuals until the final state is reached.
Animatable Protocol
The Animatable protocol lets you animate custom data. It works with types conforming to VectorArithmetic to enable interpolation.
protocol Animatable {
associatedtype AnimatableData: VectorArithmetic
var animatableData: AnimatableData { get set }
}
// Custom animatable type example
struct AnimatablePoint: VectorArithmetic {
var x: Double
var y: Double
static var zero = AnimatablePoint(x: 0, y: 0)
static func + (lhs: Self, rhs: Self) -> Self {
AnimatablePoint(x: lhs.x + rhs.x, y: lhs.y + rhs.y)
}
static func - (lhs: Self, rhs: Self) -> Self {
AnimatablePoint(x: lhs.x - rhs.x, y: lhs.y - rhs.y)
}
mutating func scale(by rhs: Double) {
x *= rhs
y *= rhs
}
var magnitudeSquared: Double {
x * x + y * y
}
}
Before iOS 17, this was the way to animate custom values like rotation angles or morphing shapes (See this advanced guide).
iOS 17+ Features
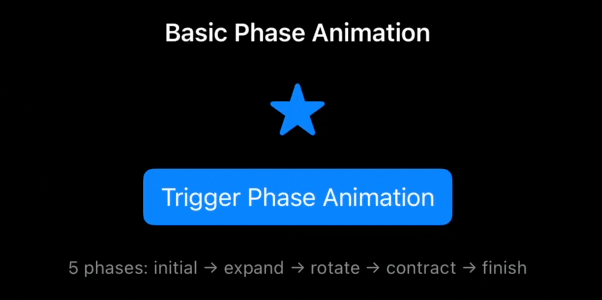
PhaseAnimator
PhaseAnimator runs animations as a sequence of phases instead of just start → end (AppCoda, Design+Code). Phases can each have their own curve and state. Good for storytelling animations and loaders.
enum AnimationPhase: CaseIterable {
case initial, expand, rotate, contract, finish
var scale: Double {
switch self {
case .initial, .finish: return 1.0
case .expand: return 1.5
case .rotate, .contract: return 1.2
}
}
var rotation: Angle {
switch self {
case .initial, .expand, .contract, .finish: return .degrees(0)
case .rotate: return .degrees(180)
}
}
}
Phase animation structure includes several key components:
- Phases: The sequence of discrete states the animation cycles through
- Trigger: Optional parameter that starts animation cycles when changed
- Content closure: View builder that applies phase-specific modifiers
- Animation closure: Defines timing and curves for each phase transition
struct PhaseAnimationExample: View {
@State private var animate = false
var body: some View {
Image(systemName: "star.fill")
.font(.largeTitle)
.phaseAnimator(AnimationPhase.allCases, trigger: animate) { content, phase in
content
.scaleEffect(phase.scale)
.rotationEffect(phase.rotation)
.foregroundStyle(phase == .rotate ? .red : .blue)
} animation: { phase in
switch phase {
case .initial: .linear(duration: 0.1)
case .expand: .bouncy(duration: 0.3)
case .rotate: .smooth(duration: 0.5)
case .contract: .easeOut(duration: 0.2)
case .finish: .spring(duration: 0.1)
}
}
.onTapGesture {
animate.toggle()
}
}
}
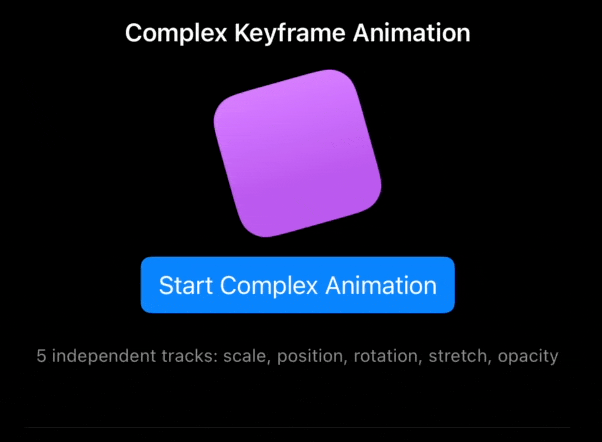
KeyframeAnimator
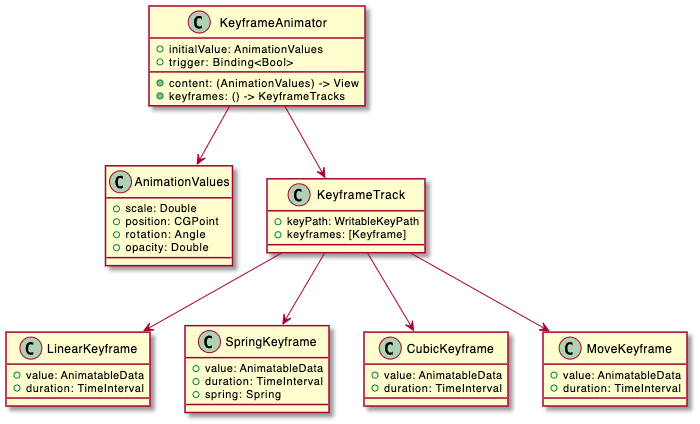
KeyframeAnimator gives fine control with independent tracks per property (AppCoda, Design+Code). Tracks can use linear, spring, cubic, or move keyframes. Perfect for detailed motion graphics or pro‑level effects.
Keyframe animation structure requires several components:
AnimationValues struct: Defines all properties that will be independently animated. Each property must conform to the Animatable protocol to enable smooth interpolation.
KeyframeTracks: Individual animation tracks for each property, specified using key paths to the corresponding property in the AnimationValues struct.
Keyframe types: Four distinct interpolation methods provide different motion characteristics:
- LinearKeyframe: Constant velocity interpolation between keyframes
- SpringKeyframe: Physics-based motion with spring dynamics
- CubicKeyframe: Smooth curves using cubic Bézier interpolation
- MoveKeyframe: Immediate value changes without interpolation
struct KeyframeAnimationExample: View {
@State private var trigger = false
struct AnimationValues {
var scale = 1.0
var verticalStretch = 1.0
var position = CGPoint.zero
var rotation = Angle.zero
var opacity = 1.0
}
var body: some View {
RoundedRectangle(cornerRadius: 20)
.fill(.purple)
.frame(width: 100, height: 100)
.keyframeAnimator(
initialValue: AnimationValues(),
trigger: trigger
) { content, values in
content
.scaleEffect(values.scale)
.scaleEffect(y: values.verticalStretch)
.offset(x: values.position.x, y: values.position.y)
.rotationEffect(values.rotation)
.opacity(values.opacity)
} keyframes: { _ in
// Scale track - bouncy entrance
KeyframeTrack(\.scale) {
LinearKeyframe(1.0, duration: 0.2) // Hold initial
SpringKeyframe(1.8, duration: 0.4, spring: .bouncy) // Expand
CubicKeyframe(1.0, duration: 0.4) // Return to normal
}
// Position track - arc movement
KeyframeTrack(\.position) {
CubicKeyframe(CGPoint(x: 50, y: -80), duration: 0.3) // Up and right
SpringKeyframe(CGPoint(x: -30, y: 40), duration: 0.4) // Down and left
LinearKeyframe(CGPoint.zero, duration: 0.3) // Return home
}
// Rotation track - independent timing
KeyframeTrack(\.rotation) {
LinearKeyframe(.degrees(0), duration: 0.4) // No rotation
CubicKeyframe(.degrees(180), duration: 0.3) // Half spin
SpringKeyframe(.degrees(360), duration: 0.3) // Complete rotation
}
// Vertical stretch - squash and stretch effect
KeyframeTrack(\.verticalStretch) {
CubicKeyframe(0.8, duration: 0.15) // Compress before jump
SpringKeyframe(1.3, duration: 0.25) // Stretch during movement
CubicKeyframe(1.0, duration: 0.6) // Return to normal
}
// Opacity track - fade effects
KeyframeTrack(\.opacity) {
LinearKeyframe(1.0, duration: 0.2) // Stay visible
CubicKeyframe(0.3, duration: 0.3) // Fade during movement
SpringKeyframe(1.0, duration: 0.5) // Fade back in
}
}
.onTapGesture {
trigger.toggle()
}
}
}
Scoped Animations
In iOS 17, .animation() can now target specific modifiers instead of whole view subtrees (WWDC talk). This avoids unnecessary animations and improves performance.
// iOS 17+ scoped animation
Text("Hello World")
.opacity(flag ? 1 : 0)
.animation(.default) {
$0.rotationEffect(flag ? .zero : .degrees(90)) // Only rotation animates
}
Picking the Right Animation
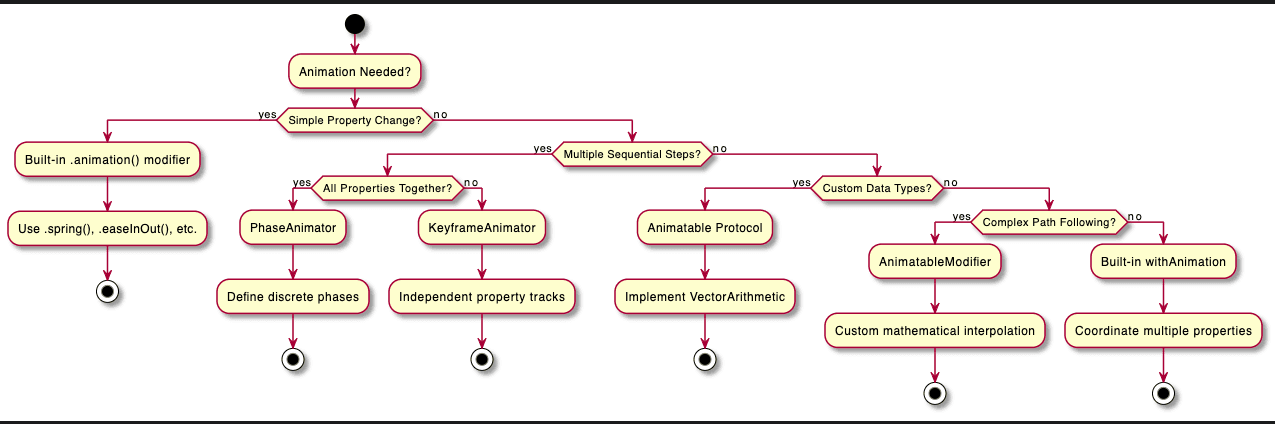 Here are few points that need to be considered:
- Simple changes: use built‑in .animation().
- Multi‑step sequences: use PhaseAnimator.
- Independent property timelines: use KeyframeAnimator.
- Custom data or math: use Animatable.
- Path following or complex interpolation: use AnimatableModifier.
Decision depends on complexity and performance needs.
Wrap Up
SwiftUI’s animation system makes complex things simpler by being declarative and state‑driven. With tools like PhaseAnimator and KeyframeAnimator in iOS 17, you can go from quick prototypes to professional motion graphics. Mastering these helps you pick the right tool, write cleaner code, and build smoother apps.
For more, check WWDC sessions: Explore SwiftUI animation and Wind your way through advanced animations.