
TextKit2: A Top-Down Approach
Part 1: The Classic Engine: A Simple Guide to TextKit 1
Before diving into TextKit 2, it’s essential to understand its predecessor. For over two decades, TextKit 1 has been the workhorse of text layout on Apple's platforms. Its architecture is best understood as a trio of interconnected components working in a flow similar to the Model-View-Controller (MVC) pattern.
The Core Trio of TextKit 1
- NSTextStorage (The Model: The "What") This object is the source of truth. It’s a subclass of NSMutableAttributedString that holds all the text and its associated attributes (like font, color, and paragraph style). Its key responsibility is to automatically notify its associated layout manager whenever the text or its attributes change.
- NSLayoutManager (The Controller: The "How") This is the brains of the operation. When NSTextStorage reports a change, the NSLayoutManager gets to work. It converts the characters from the storage into glyphs (the visual representation of characters) and arranges them into lines. This is where the core complexity of TextKit 1 lies—developers often had to interact directly with glyphs to achieve custom layouts, which was powerful but error-prone, especially for complex international scripts.
- NSTextContainer (The View's Geometry: The "Where") This object defines the geometric area where the text will be laid out. Think of it as the canvas or bounding box for the text. It can be a simple rectangle or a complex shape with exclusion paths, allowing text to flow around images or other UI elements. A UITextView has a text container that defines its text rendering area.
How It Works Together: The Flow
The process is a clear chain reaction:
- You change the text in the NSTextStorage.
- NSTextStorage automatically tells the NSLayoutManager about the edit.
- NSLayoutManager lays out the glyphs, breaking them into lines to fit inside the geometric bounds defined by the NSTextContainer.
- The UITextView then asks the NSLayoutManager to draw these glyphs on screen.
// A classic TextKit 1 stack setup
let textStorage = NSTextStorage(string: "Hello, TextKit 1!")
let layoutManager = NSLayoutManager()
let textContainer = NSTextContainer(size: CGSize(width: 200, height: 100))
// Connecting the components
textStorage.addLayoutManager(layoutManager)
layoutManager.addTextContainer(textContainer)
// In a custom view's draw method, you would then call:
// layoutManager.drawGlyphs(forGlyphRange: ..., at: ...)
While powerful, this architecture had its limits. Performance suffered with very large documents because the layout manager had to process text contiguously. Furthermore, direct glyph handling made it difficult to correctly render complex scripts like Arabic or Devanagari. These challenges paved the way for a complete redesign.
Part 2: The Modern Engine: A Top-Down View of TextKit 2
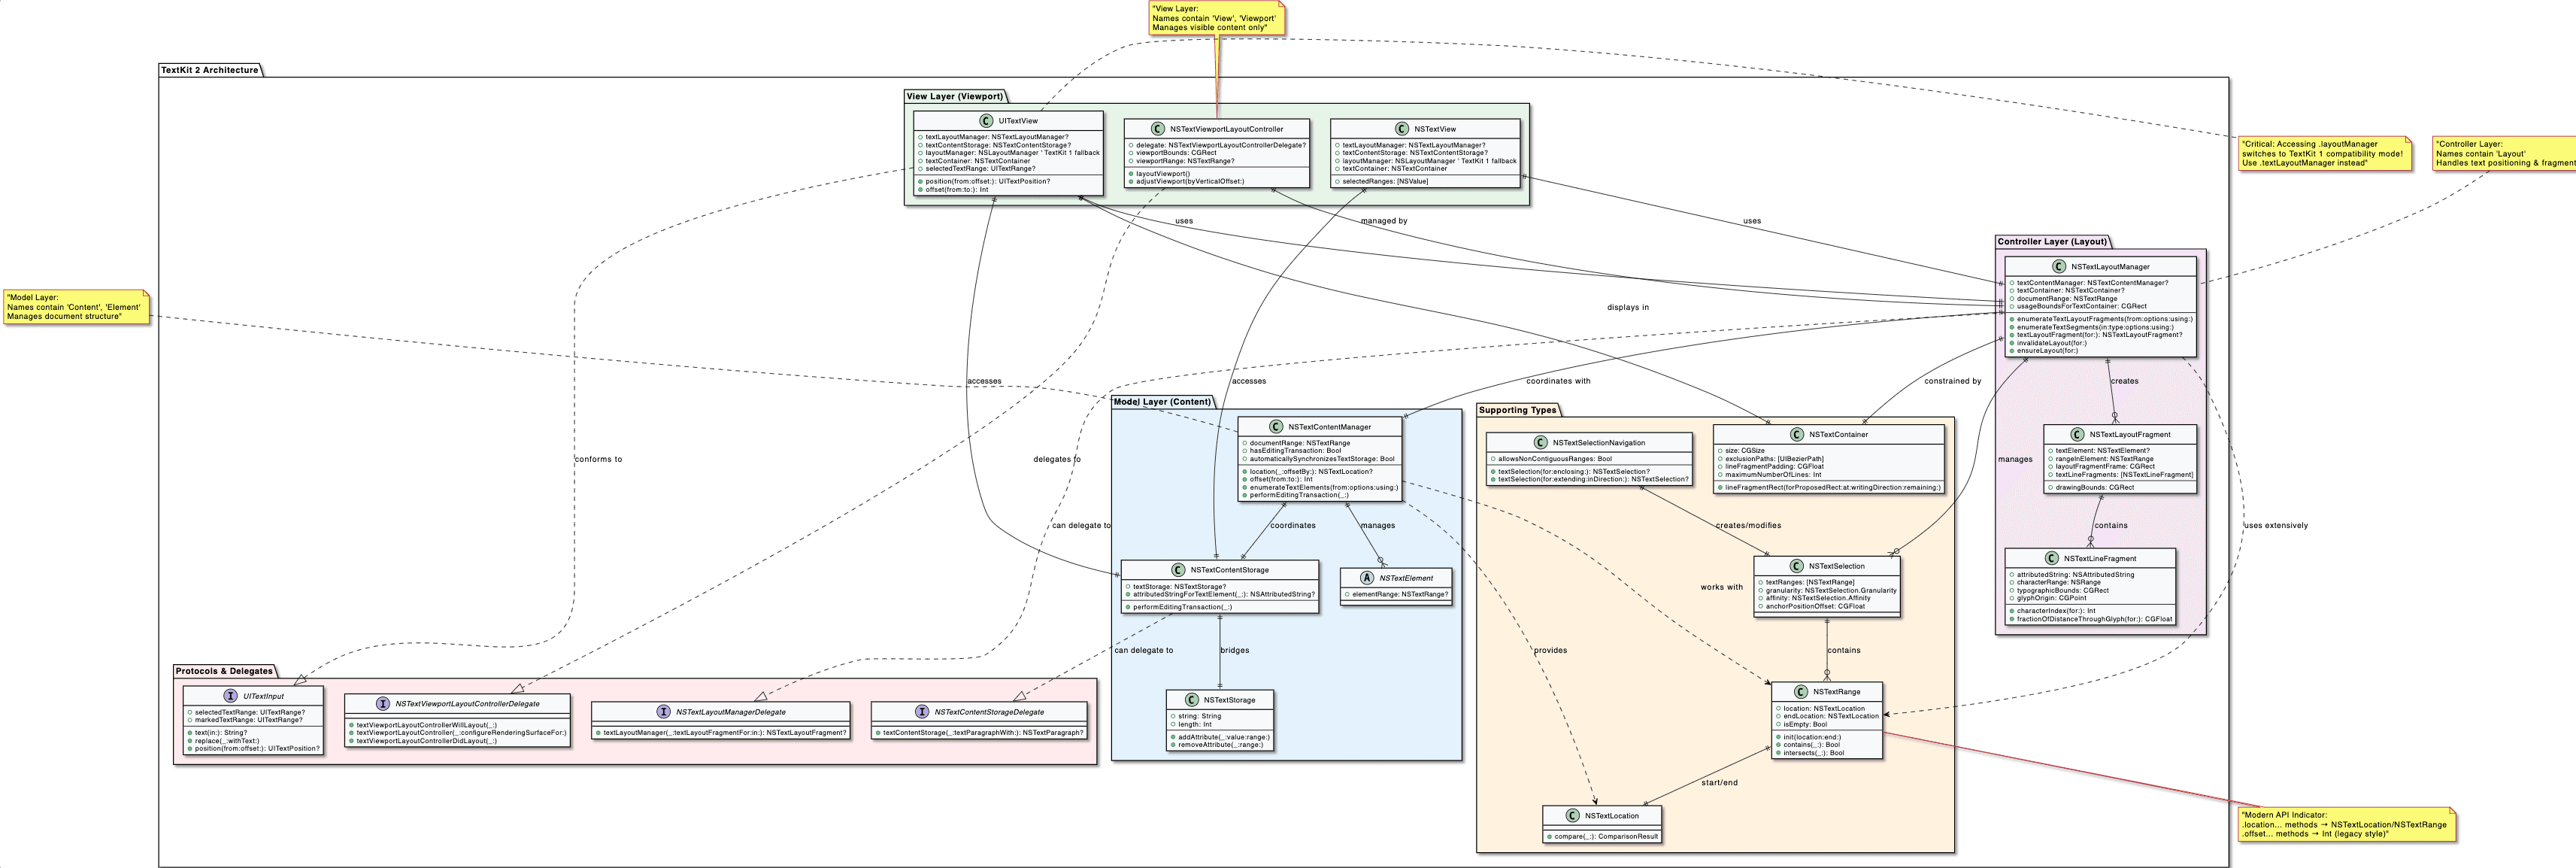
TextKit 2 was built from the ground up with three principles in mind: performance, correctness, and safety. It replaces the direct glyph manipulation of TextKit 1 with a higher-level, component-based architecture. The best way to understand this new world is by again using the MVC pattern as a mental model.
TextKit2 - Cheat sheet for understanding
 TextKit2 Components
The MVC Architecture of TextKit 2
 TextKit2 MVC Architecture
The Model Layer: Managing Content
Mnemonic: Look for names containing Content or Element.
The model layer in TextKit 2 is far more sophisticated. Instead of seeing text as just a stream of characters, it thinks in terms of semantic "elements."
- NSTextContentManager: This is the high-level coordinator for the content. It represents the document as a sequence of NSTextElement objects (like paragraphs or attachments), providing a more structured view of the content.
- NSTextContentStorage: This component acts as the bridge between the old NSTextStorage and the new system. Its most important job is to enforce that all content modifications happen within a transaction via performEditingTransaction(:)_. This ensures the entire system stays in sync.
- NSTextElement: An abstract representation of a piece of content, such as a paragraph.
The Controller Layer: Orchestrating Layout
Mnemonic: Look for names containing Layout.
This layer is responsible for arranging the content into a visual representation, but critically, it does not deal with glyphs.
- NSTextLayoutManager: The new central coordinator, replacing NSLayoutManager. It orchestrates the layout process by creating immutable NSTextLayoutFragment objects on demand.
- NSTextLayoutFragment: The result of a layout operation. It's an immutable object representing a block of laid-out text, like a paragraph. It contains geometry information and one or more NSTextLineFragment objects.
- NSTextLineFragment: Represents a single visual line of text within a layout fragment.
The View Layer: Rendering the Visible
Mnemonic: Look for names containing View or Viewport.
This layer is where TextKit 2's performance shines. It ensures that the app only does the work necessary to render what's currently on screen.
- NSTextViewportLayoutController: The performance hero of TextKit 2. This object monitors the visible portion (the "viewport") of the text view and instructs the NSTextLayoutManager to perform layout only for the fragments visible on screen. This is what makes scrolling through massive documents in TextKit 2 incredibly fast. It operates using a delegate pattern to notify your app about layout events.
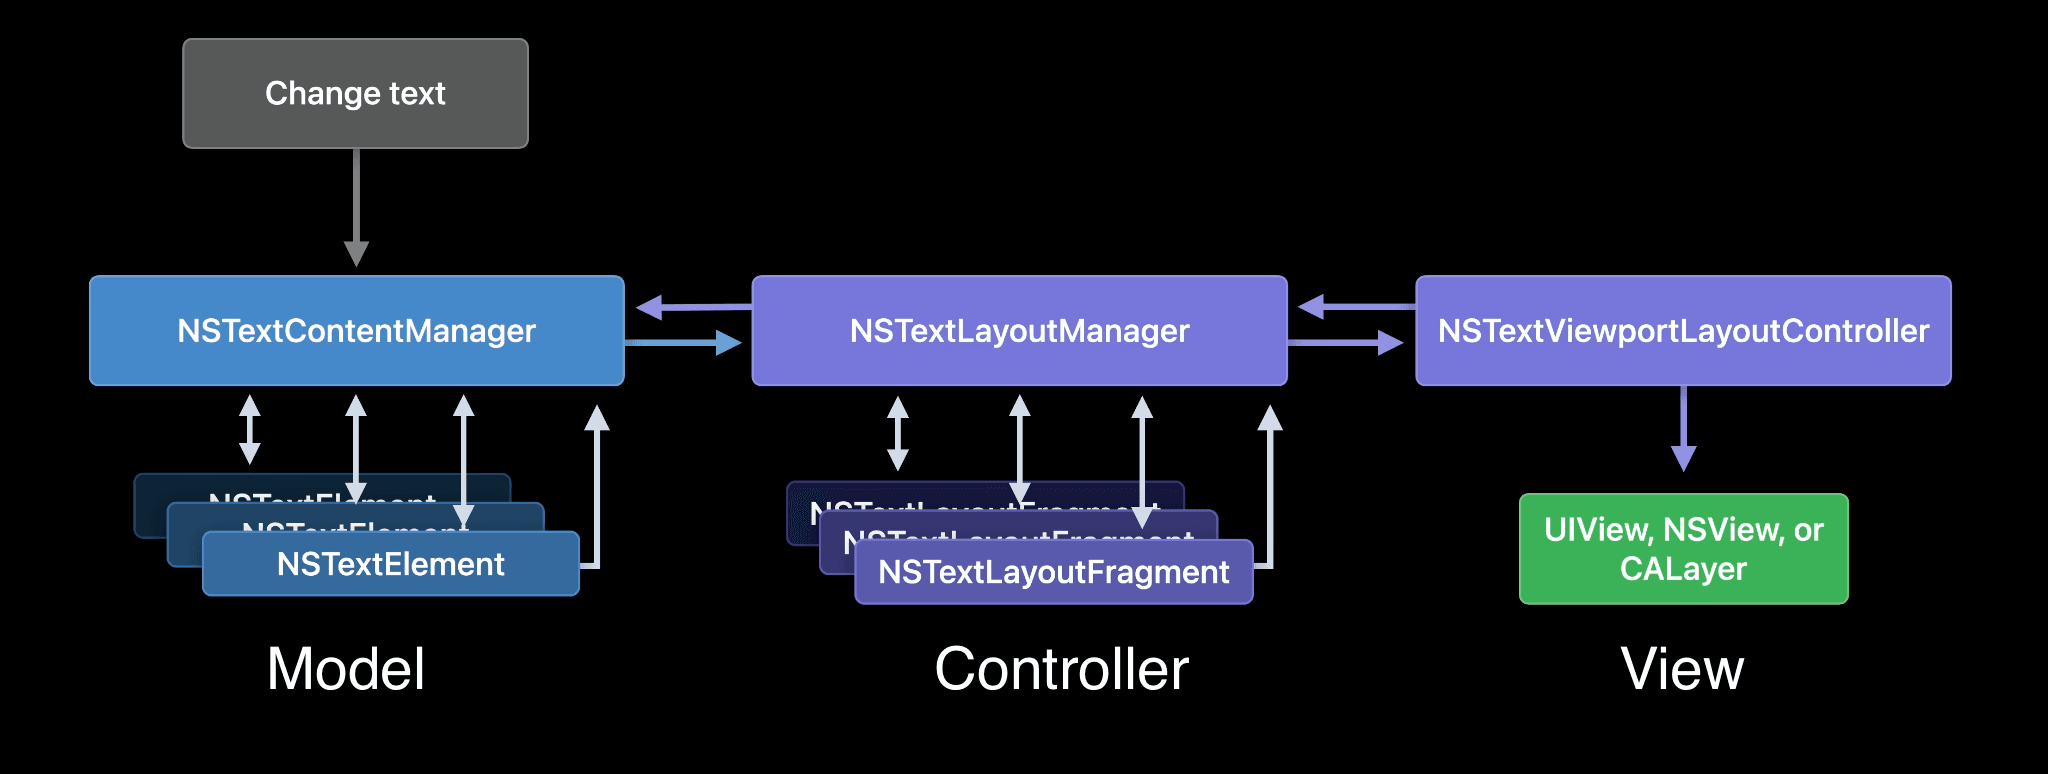
How It Works Together: The New Flow
- A text change is made inside a performEditingTransaction block on the NSTextContentStorage.
- The NSTextContentManager is notified of the change to its elements.
- The NSTextViewportLayoutController detects that the content has changed within its visible area.
- It asks the NSTextLayoutManager to generate new _NSTextLayoutFragment_s only for the visible region.
- The text view then renders these fragments.
// A TextKit 2 setup is often handled by UITextView automatically.
// To customize, you would interact with its properties.
if #available(iOS 16, *) {
guard let textLayoutManager = myTextView.textLayoutManager,
let contentManager = textLayoutManager.textContentManager else {
return
}
// Making a safe, transactional edit
contentManager.performEditingTransaction {
// Modify the underlying NSTextStorage here
let fullRange = NSRange(location: 0, length: contentManager.textStorage?.length ?? 0)
contentManager.textStorage?.addAttribute(.foregroundColor, value: UIColor.red, range: fullRange)
}
// The viewport controller and layout manager handle the rest automatically.
}
Part 3: The Bridge: A Strategic Guide to Migration
Migrating to TextKit 2 is less about a one-to-one API replacement and more about a shift in mindset. Here’s a strategic approach to make the process manageable.
The Core Migration Strategy: From Glyphs to Elements
The fundamental rule is to stop thinking about glyphs. Instead, follow this three-step process for any code that uses NSLayoutManager:
- Identify: Find every instance where your code accesses textView.layoutManager or uses glyph-related APIs.
- Re-think the Goal: Ask yourself, "What high-level task am I trying to accomplish?" Instead of "I need to iterate through glyphs to find their rects," your goal is likely "I need the bounding box for a selected range of text."
- Implement with TextKit 2: Use TextKit 2's high-level, fragment-based APIs to achieve that goal. For example, to get the geometry of a text range, you would use textLayoutManager.enumerateTextSegments(in:...).
Critical Tip: Avoid accessing the layoutManager property on UITextView if you want to use TextKit 2. Accessing it will permanently switch that text view instance into a TextKit 1 compatibility mode, losing all the benefits of TextKit 2. Use a version check:
if let textLayoutManager = textView.textLayoutManager {
// Use modern TextKit 2 APIs
} else {
// Fallback for older systems or compatibility mode
let layoutManager = textView.layoutManager // Use legacy TextKit 1 APIs
}
Navigating the New APIs: Heuristics for Success
The number of new APIs can be overwhelming. Use these mental shortcuts to quickly find what you need.
Tip 1: Use MVC as Your Mental Model
When you're unsure which manager to use, think about its role in the MVC pattern:
- Is it about the content itself? (The data, its structure, or making edits). You need the Model layer. Look for NSTextContentManager and NSTextContentStorage.
- Is it about layout geometry? (Figuring out where text goes, getting line fragments, or finding the bounds of a range). You need the Controller layer. Use NSTextLayoutManager.
- Is it about rendering performance or visibility? (Responding to what's on screen). You need the View layer. Implement the NSTextViewportLayoutControllerDelegate.
Tip 2: Decode API Names
The API names themselves offer clues about whether you're in the old world or the new.
- APIs with .offset... or returning Int: These terms often relate to the old TextKit 1 world of linear character indexing (NSRange). They treat the text store as a simple array of characters.
- Example: textView.offset(from:to:) returns an Int.
- APIs with .location... or returning an Object: This is the modern TextKit 2 approach. A location is not just an integer; it’s a descriptive object (NSTextLocation) that understands the element-based structure of the document. This is what allows TextKit 2 to handle complex layouts correctly.
- Example: textContentManager.location(from:offsetBy:) returns an NSTextLocation?.
Migration Example: (check Apple's code example for full references)
Before diving in, let's download the Apple's code example to play with it.
Pattern 1: Custom Drawing via Viewport-Based Rendering The Old Way (TextKit 1): Subclass NSLayoutManager and override methods like drawGlyphs(forGlyphRange:) or drawBackground(forGlyphRange:). This was complex and tightly coupled layout with drawing.
The New Way (TextKit 2): Implement the NSTextViewportLayoutControllerDelegate. This delegate is called by the system only for fragments that are visible, making it incredibly performant. You create and manage CALayers for each fragment, decoupling layout from rendering.
From TextDocumentView.swift, this method is called for each visible NSTextLayoutFragment. The app creates a custom CALayer (TextLayoutFragmentLayer) to render the fragment's content. This is the modern replacement for custom drawing.
// From TextDocumentView.swift [Apple Code Example]
// This delegate method is the core of TextKit 2's custom rendering.
func textViewportLayoutController(_ textViewportLayoutController: NSTextViewportLayoutController,
configureRenderingSurfaceFor textLayoutFragment: NSTextLayoutFragment) {
// Find or create a CALayer for this specific fragment.
let (textLayoutFragmentLayer, didCreate) = findOrCreateLayer(textLayoutFragment)
// If the layer already existed, update its geometry.
if !didCreate {
let oldPosition = textLayoutFragmentLayer.position
textLayoutFragmentLayer.updateGeometry() // Update frame based on fragment
// Animate the layer if its position changed.
if oldPosition != textLayoutFragmentLayer.position {
animate(textLayoutFragmentLayer, from: oldPosition, to: textLayoutFragmentLayer.position)
}
}
// Add the layer to the view's content.
contentLayer.addSublayer(textLayoutFragmentLayer)
}
private func findOrCreateLayer(_ textLayoutFragment: NSTextLayoutFragment) -> (TextLayoutFragmentLayer, Bool) {
if let layer = fragmentLayerMap.object(forKey: textLayoutFragment) as? TextLayoutFragmentLayer {
return (layer, false)
} else {
let layer = TextLayoutFragmentLayer(layoutFragment: textLayoutFragment, padding: padding)
fragmentLayerMap.setObject(layer, forKey: textLayoutFragment)
return (layer, true)
}
}
Pattern 2: Dynamic Content Filtering (Hiding/Showing Elements) The Old Way (TextKit 1): This was difficult and often required destructively editing the NSTextStorage to remove content, or complex calculations to skip drawing certain glyph ranges.
The New Way (TextKit 2): Implement the NSTextContentManagerDelegate. The shouldEnumerate method allows you to tell the layout system to completely ignore certain NSTextElements (like paragraphs) on the fly, without ever touching the backing store.
In TextDocumentViewController.swift, this delegate method is used to hide comments by returning false for any paragraph that has a commentDepth attribute.
// From TextDocumentViewController.swift [Apple Code Example]
// This delegate method acts as a filter for the layout system.
func textContentManager(_ textContentManager: NSTextContentManager,
shouldEnumerate textElement: NSTextElement,
options: NSTextContentManager.EnumerationOptions) -> Bool {
// If 'showComments' is false, we check each paragraph.
if !showComments {
if let paragraph = textElement as? NSTextParagraph {
// Check for the custom 'commentDepth' attribute.
let commentDepthValue = paragraph.attributedString.attribute(.commentDepth, at: 0, effectiveRange: nil)
if commentDepthValue != nil {
return false // Tell the layout manager to skip this element entirely.
}
}
}
return true // Enumerate all other elements.
}
Pattern 3: Applying On-the-Fly Rendering Attributes The Old Way (TextKit 1): Use layoutManager.addTemporaryAttribute(...). This worked, but the new pattern is more powerful and integrated with the element-based model.
The New Way (TextKit 2): Implement the NSTextContentStorageDelegate. The textParagraphWith method lets you intercept a paragraph before layout and return a new NSTextParagraph with different attributes. This is perfect for applying display-only styles (like highlight colors or different fonts) without modifying the original NSTextStorage.
In TextDocumentViewController.swift, this is used to apply a specific font and color to comments just for display purposes.
// From TextDocumentViewController.swift [Apple Code Example]
// This delegate method allows injecting attributes just before layout.
func textContentStorage(_ textContentStorage: NSTextContentStorage, textParagraphWith range: NSRange) -> NSTextParagraph? {
// Get the original paragraph from the text storage.
let originalText = textContentStorage.textStorage!.attributedSubstring(from: range)
// Check if it's a comment.
if originalText.attribute(.commentDepth, at: 0, effectiveRange: nil) != nil {
let displayAttributes: [NSAttributedString.Key: AnyObject] = [.font: commentFont, .foregroundColor: commentColor]
let textWithDisplayAttributes = NSMutableAttributedString(attributedString: originalText)
let rangeForDisplayAttributes = NSRange(location: 0, length: textWithDisplayAttributes.length - 2)
textWithDisplayAttributes.addAttributes(displayAttributes, range: rangeForDisplayAttributes)
// Return a new paragraph with these temporary attributes. TextKit 2 will use this for layout.
return NSTextParagraph(attributedString: textWithDisplayAttributes)
}
// Returning nil tells TextKit 2 to use the original paragraph.
return nil
}
Pattern 4: Custom Layout with Custom Fragments The Old Way (TextKit 1): Extensive subclassing of NSLayoutManager was required to create complex custom layouts.
The New Way (TextKit 2): Implement the NSTextLayoutManagerDelegate. The textLayoutFragmentFor method allows you to provide your own custom NSTextLayoutFragment subclass for specific elements. This is ideal for creating unique visual treatments, like the comment bubbles in the sample app.
In TextDocumentView.swift, this delegate method checks if a paragraph is a comment and, if so, returns a custom BubbleLayoutFragment instance instead of the standard one.
// From TextDocumentView.swift [Apple Code Example]
// This delegate method allows substituting a custom layout fragment class.
func textLayoutManager(_ textLayoutManager: NSTextLayoutManager,
textLayoutFragmentFor location: NSTextLocation,
in textElement: NSTextElement) -> NSTextLayoutFragment {
let index = textLayoutManager.offset(from: textLayoutManager.documentRange.location, to: location)
let commentDepthValue = textContentStorage!.textStorage!.attribute(.commentDepth, at: index, effectiveRange: nil) as! NSNumber?
if commentDepthValue != nil {
// This is a comment, so return our custom fragment class.
let layoutFragment = BubbleLayoutFragment(textElement: textElement, range: textElement.elementRange)
layoutFragment.commentDepth = commentDepthValue!.uintValue
return layoutFragment
} else {
// For normal text, use the default fragment class.
return NSTextLayoutFragment(textElement: textElement, range: textElement.elementRange)
}
}
Pattern 5: Hit-Testing and Drawing Selection Rects The Old Way (TextKit 1): Use layoutManager.characterIndex(for:in:) for hit-testing and layoutManager.enumerateEnclosingRects(forGlyphRange:...) for selection geometry.
The New Way (TextKit 2): Use textLayoutManager.textLayoutFragment(for: aPoint) for hit-testing. For selection rects, use textLayoutManager.enumerateTextSegments(in:...). This API is more robust and correctly handles complex scripts and non-contiguous selections.
The TextDocumentView.swift sample demonstrates both patterns clearly.
// From TextDocumentView.swift [Apple Code Example]
// Pattern for Hit-Testing (e.g., on a long press gesture)
@objc func handleLongPress(_ gestureRecognizer: UILongPressGestureRecognizer) {
var longPressPoint = gestureRecognizer.location(in: self)
...
// The modern, correct way to find what text element is at a specific point.
if let layoutFragment = textLayoutManager!.textLayoutFragment(for: longPressPoint) {
viewController.showCommentPopoverForLayoutFragment(layoutFragment)
}
}
// Pattern for Drawing Selection/Highlight Rects
private func updateSelectionHighlights() {
...
for textSelection in textLayoutManager!.textSelections {
for textRange in textSelection.textRanges {
// EnumerateTextSegments is the modern replacement for enumerateEnclosingRects.
textLayoutManager!.enumerateTextSegments(in: textRange, type: .highlight, options: []) {
(textSegmentRange, textSegmentFrame, baselinePosition, textContainer) in
// Create a CALayer for each segment of the selection.
let highlight = TextDocumentLayer()
highlight.frame = textSegmentFrame
selectionLayer.addSublayer(highlight)
return true // Continue enumerating.
}
}
}
}
Pattern 6: Getting the Rect for a Text Range This common task clearly shows the shift in thinking.
TextKit 1 (Glyph-based):
func getRectForNSRange_TextKit1(range: NSRange, layoutManager: NSLayoutManager, container: NSTextContainer) -> CGRect {
// 1. Convert character range to glyph range (can be error-prone)
let glyphRange = layoutManager.glyphRange(forCharacterRange: range, actualCharacterRange: nil)
// 2. Get the bounding rect for the glyphs
return layoutManager.boundingRect(forGlyphRange: glyphRange, in: container)
}
TextKit 2 (Fragment-based):
func getRectForNSTextRange_TextKit2(textRange: NSTextRange, layoutManager: NSTextLayoutManager) -> CGRect {
var finalRect = CGRect.null
// 1. Enumerate over the segments in the range. TextKit 2 handles the complexity.
layoutManager.enumerateTextSegments(in: textRange, type: .standard, options: [.rangeNotRequired]) {
(segmentRange, segmentRect, baselinePosition, textElement) -> Bool in
// 2. Union all the segment rects to get the total bounding box.
if finalRect.isNull {
finalRect = segmentRect
} else {
finalRect = finalRect.union(segmentRect)
}
return true // Continue enumeration
}
return finalRect
}
The TextKit 2 version is more descriptive, safer, and guaranteed to be correct across all languages, as it delegates the hard work to the framework.
By embracing this top-down approach—understanding the old, learning the new through its architecture, and using smart strategies for migration—you can confidently harness the power of TextKit 2 to build fast, correct, and beautiful text experiences in your apps.